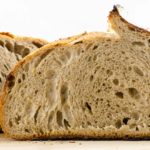
Sourdough Rye Bread
Here's how to make a wonderful loaf of sourdough rye bread. This loaf is reliable and extremely versatile. It makes a great snack eaten out of hand, toast, sandwiches, croutons, hearty French toast, and so much more.
Servings: 1 loaf
Calories: 124kcal
Equipment
Ingredients
For the leaven
- 10 grams ripe sourdough starter
- 25 grams room-temperature water about 75°F
- 25 grams whole-grain rye flour
For the loaf
- 60 grams leaven
- 300 grams room-temperature water
- 310 grams bread flour
- 80 grams rye flour
- 8 grams fine sea salt
Instructions
- Make the leaven
- Place (10 grams) of ripe sourdough starter into a glass or ceramic container.
- Pour in (25 grams) of room-temperature water (about 75°F).
- Spoon in (25 grams) of whole-grain rye flour.
- Mix well, until there's no dry flour. Cover loosely and let it ferment at room temperature for 8 to 12 hours.
- Prepare the dough
- Place the ripe leaven into a large mixing bowl.
- Pour in the water and use your hand to break up the leaven a bit, distributing it throughout the water.
- Add the bread flour and the rye flour.
- Use your hand to mix very well for a few minutes, until you can't see or feel any dry pockets of flour. Squeeze the dough in your fist, turn your elbow and wrist, release the dough, and repeat. (See note 2.)
- Cover the bowl with a damp towel and let it sit for 20 minutes.
- Sprinkle the salt over the surface of the dough. Then sprinkle a little bit of water over the salt with your fingers to help the salt dissolve.
- Just like in the previous step, use your hand to work the dough, squeezing it in your palm, turning your wrist and elbow, and repeating until you can't feel any undissolved salt granules. (See notes 3 and 4.)
- After mixing, cover the dough again and let rest for 30 minutes. This is the beginning of your 3-4 hour bulk fermentation timeline.
- Every 30-45 minutes during bulk fermentation, perform a stretch and fold. Wet your hand so it won't stick to the dough. Slide your hand under a section of the dough, releasing it from the bowl. Gently stretch this section up and out a bit. Aim to stretch the dough without tearing it at all. Fold this section of the dough into the center. Repeat this process three or four times, turning the bowl 90-ish degrees each time, until you've worked your way around the entire dough mass and folded each section to the center. Cover the dough. (See notes 5 and 6 for cues about when bulk fermentation is complete.)
- Shape the dough
- Dough is ready to shape when it has grown in volume by at least ⅓ and you see fermentation bubbles breaking the surface.
- Turn the dough out of the bowl and onto a floured work surface, doing your best not to tear or deflate the dough. Tip the bowl little by little, and use a bowl scraper (or a silicone spatula if that's what you've got) to encourage the dough to release from the bowl as you go.
- Using your hands or a bench knife, turn the top, bottom, left side, and right side of the dough in toward the center. Then tuck each of the four corners into the center, creating a rough round shape.
- Use your bench knife to carefully flip the dough over, so that the seam side is down. You can use floured hands to gently encourage the dough into a round shape, but we're mostly leaving it alone at this point to prevent deflation. Cover with your damp towel and let rest for about 20 minutes, until the shape of the dough has relaxed.
- Use your bench knife to flip the dough back over so it's seam-side up. If there's any excess flour on the top of the dough, brush it off with your hand so it doesn't prevent the dough from sticking to itself.
- Tuck the top of the dough toward you a bit. Stitch in the sides to the center, section by section, alternating sections from the left and right down the length of the dough until you reach the bottom. (Refer to the video for visual cues.)
- Starting from the bottom, roll the dough away from you onto itself, tucking in some tension as you go. End with the dough seam-side down. Flour the top of the loaf well.
- Use your bench knife to help seal the seam a bit by sliding it under the loaf in a swift motion, parallel to the direction of the seam. Then pick up the loaf and carefully flip it over, placing it seam-side up into the basket.
- Cover the top of the loaf with cloth to absorb any condensation, and then place the whole thing in a plastic bag to prevent it from losing moisture.
- Place the loaf into the fridge to rest overnight (anywhere from 8 to about 24 hours is fine).
- Final proof and bake
- About an hour before you'd like to bake the bread, remove it from the fridge. Remove from bag but keep wrapped in cloth in proofing basket. You'll know the dough is ready to bake when it has swollen up a bit and stays indented for a moment when you gently poke it with your finger.
- While the dough proofs, preheat oven to 480°F. When the oven comes up to temperature, place your Dutch oven on the middle rack to preheat for 20 minutes.
- When the dough is ready, carefully turn it out onto a piece of parchment.
- If you like, gently rub some flour into the top of of the loaf and brush off any excess.
- Next, score the loaf. There are many beautiful ways to do this, and over time it's fun to experiment. For simplicity, you can start by making a single ¼-inch-deep cut about ¾ of the way across the loaf, mimicking the curvature of the loaf itself.
- If you like, add decorative scoring. Try to work quickly, since the loaf will spread a bit as it sits on the parchment.
- Very carefully remove the preheated Dutch oven from the oven and lift the lid. Working quickly to prevent too much heat from dissipating, lift the loaf by the parchment handles and transfer it into the Dutch oven.
- Replace the lid. Slide the Dutch oven onto your oven rack and bake with the lid on for 20 minutes.
- After 20 minutes, remove the lid. Reduce the oven temperature to 465° and continue baking for 15 to 20 minutes, until the crust is as dark as you like.
- Remove loaf from Dutch oven and cool completely — or as much as you can stand — on a rack before slicing.
Notes
- I typically use Wrens Abruzzi rye flour from Barton Springs Mill for both my starter and this bread, along with King Arthur bread flour.
- You can see the motion in action in the video. The dough at this stage will be extremely sticky. If you're used to working with commercial yeast, you'll quickly see and feel that the sourdough process is quite different. Don't worry — sticky is what we're looking for. A bowl scraper will help remove dough from your hand.
- The dough will still be fairly sticky, but much less so than before the autolyse. It should be easier to work with, easier to pull away from the bowl, and easier to scrape off your hand afterward.
- This is a good time to assess your dough for moisture. (At first you'll have to guess a bit, but over time you'll grow to understand what the dough should feel like.) If the dough feels very stiff and hard to work with at this stage, you can add more water in 20-gram increments. I don't usually find this necessary with the combination of flours that I use and my New Jersey baking environment, but it's possible that you will.
- Bulk fermentation is likely to take 3 to 3 ½ hours in warmer conditions, and 3 ½ to 4 (or occasionally 4 ½) hours in colder conditions. Especially toward the end of bulk fermentation, take care to handle the dough gently so you don't tear or deflate it.
- You'll know that it's time to move from bulk fermentation to shaping the dough when you see the following cues. Recognizing them will get much easier over time. (1) The dough has increased in volume by at least ⅓. (2) You see fermentation bubbles breaking the top surface of the dough and appearing around the sides. (3) If you use a wet finger to gently poke the dough, you can see bubbles trapped inside the dough.
- In order for the bread to rise properly, you'll need to add some steam to the baking environment. A lidded Dutch oven is a simple way to accomplish this, but it's not the only way. If you don't have a Dutch oven, do this instead: Place a heavy metal baking pan (such as a 9x13x2-inch pan) on a rack below the one you intend to bake on. Preheat this pan with your oven. If you have a pizza stone, place it on a rack above the one with the metal pan, ideally in the center of the oven. Preheat that as well. If you don't have a pizza stone, preheat a baking sheet instead. When the dough is scored and ready to bake, transfer it, using the parchment handles, onto the pizza stone or baking sheet. Then carefully pour hot water into the pan and close the oven. Bake in the steamy environment for 20 minutes. Then remove the pan and continue baking for 15 to 20 minutes, until the crust is as dark as you'd like.
- Due to its slightly tacky, moist interior, sourdough keeps well at room temperature for several days. We usually end up leaving it out on a cutting board overnight without even wrapping it, and it's always gone by halfway through the next day.If your brood doesn't devour bread as quickly, you can wrap it in foil or keep it in a bread box once it's completely cool. For longer-term storage, slice, freeze, and toast straight from the freezer.
Nutrition
Serving: 1 | Calories: 124kcal | Carbohydrates: 25g | Protein: 4g | Fat: 1g | Sodium: 260mg | Fiber: 2g