

This post may contain affiliate links. Learn more.
Here’s how to make perfect homemade caramel apples with real ingredients (no corn syrup and no prepackaged caramel candies). Along with a batch of these fabulous fall treats, you’ll get an easy lesson in caramel science.
Why we love this recipe & why it works
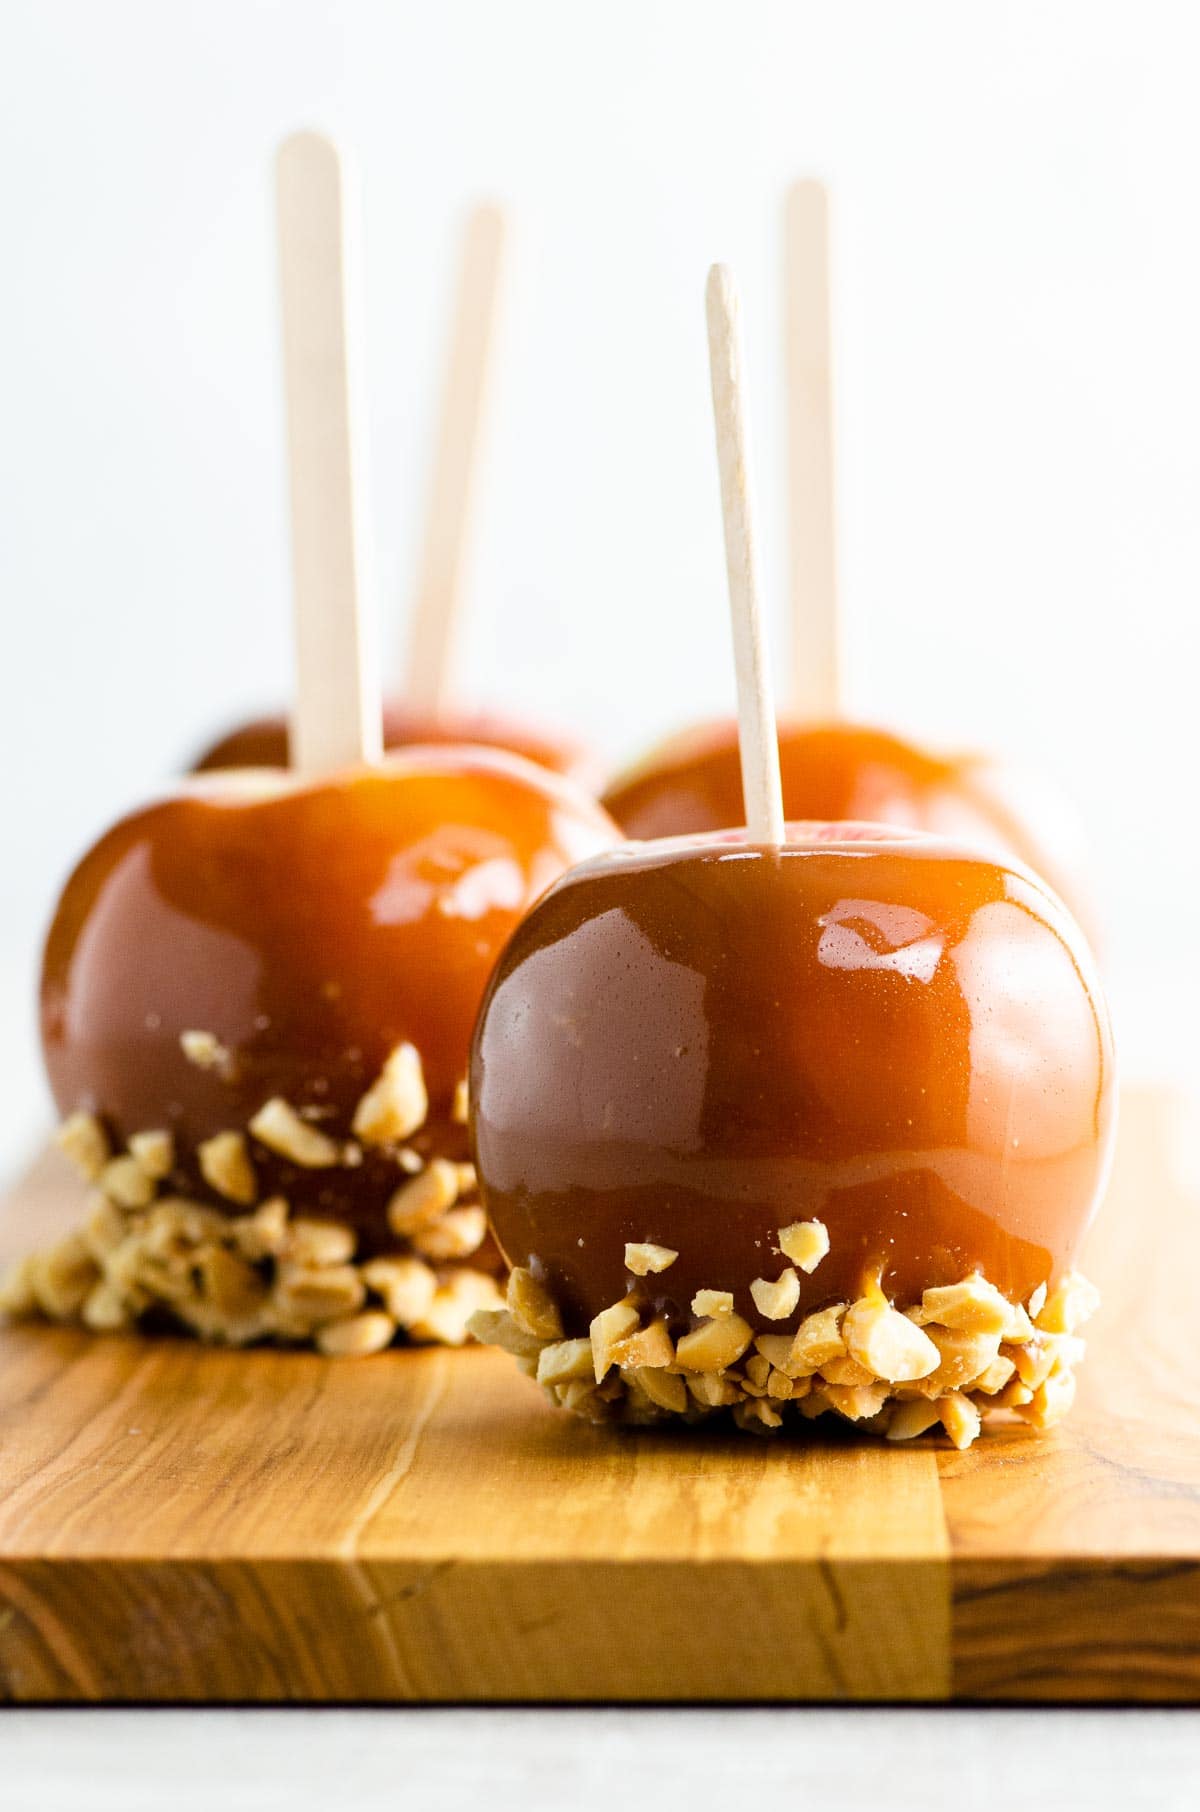
Our homemade caramel apples are just right. They’re:
- Made from small, crisp, tart apples that provide the perfect counterpoint to the sweet, sticky coating
- Covered with perfectly soft, chewy caramel
- Taken to the next level with the savory crunch of roasted, salted peanuts
Homemade caramel is easier than you may think. This recipe uses a two-step method so that you can control the taste and the texture separately. Here’s why it works.
- Washing and drying the apples meticulously removes any wax and ensures the caramel will stick.
- Making the sugar syrup before adding the cream lets you decide how dark it gets. This way, you can focus on flavor without worrying about texture. There’s a sweet spot at medium-dark amber that’s full of flavor but not overly bitter. If you were using a thermometer at this stage, you’d look for a temperature between about 340°F and 349°F, depending on your personal preference. I prefer to judge this stage by sight and smell.
- Adding a little bit of fine sea salt takes the edge off the caramel’s sweetness without tasting salted
- Using a 1:1 ratio by weight of sugar to cream and cooking the caramel sauce to 250°F yields a caramel that’s firm enough to set on the apples but soft enough to bite into comfortably
- Dipping the apples while cold helps the caramel set
What you’ll need
Here’s a glance at the ingredients you’ll need to make this recipe.
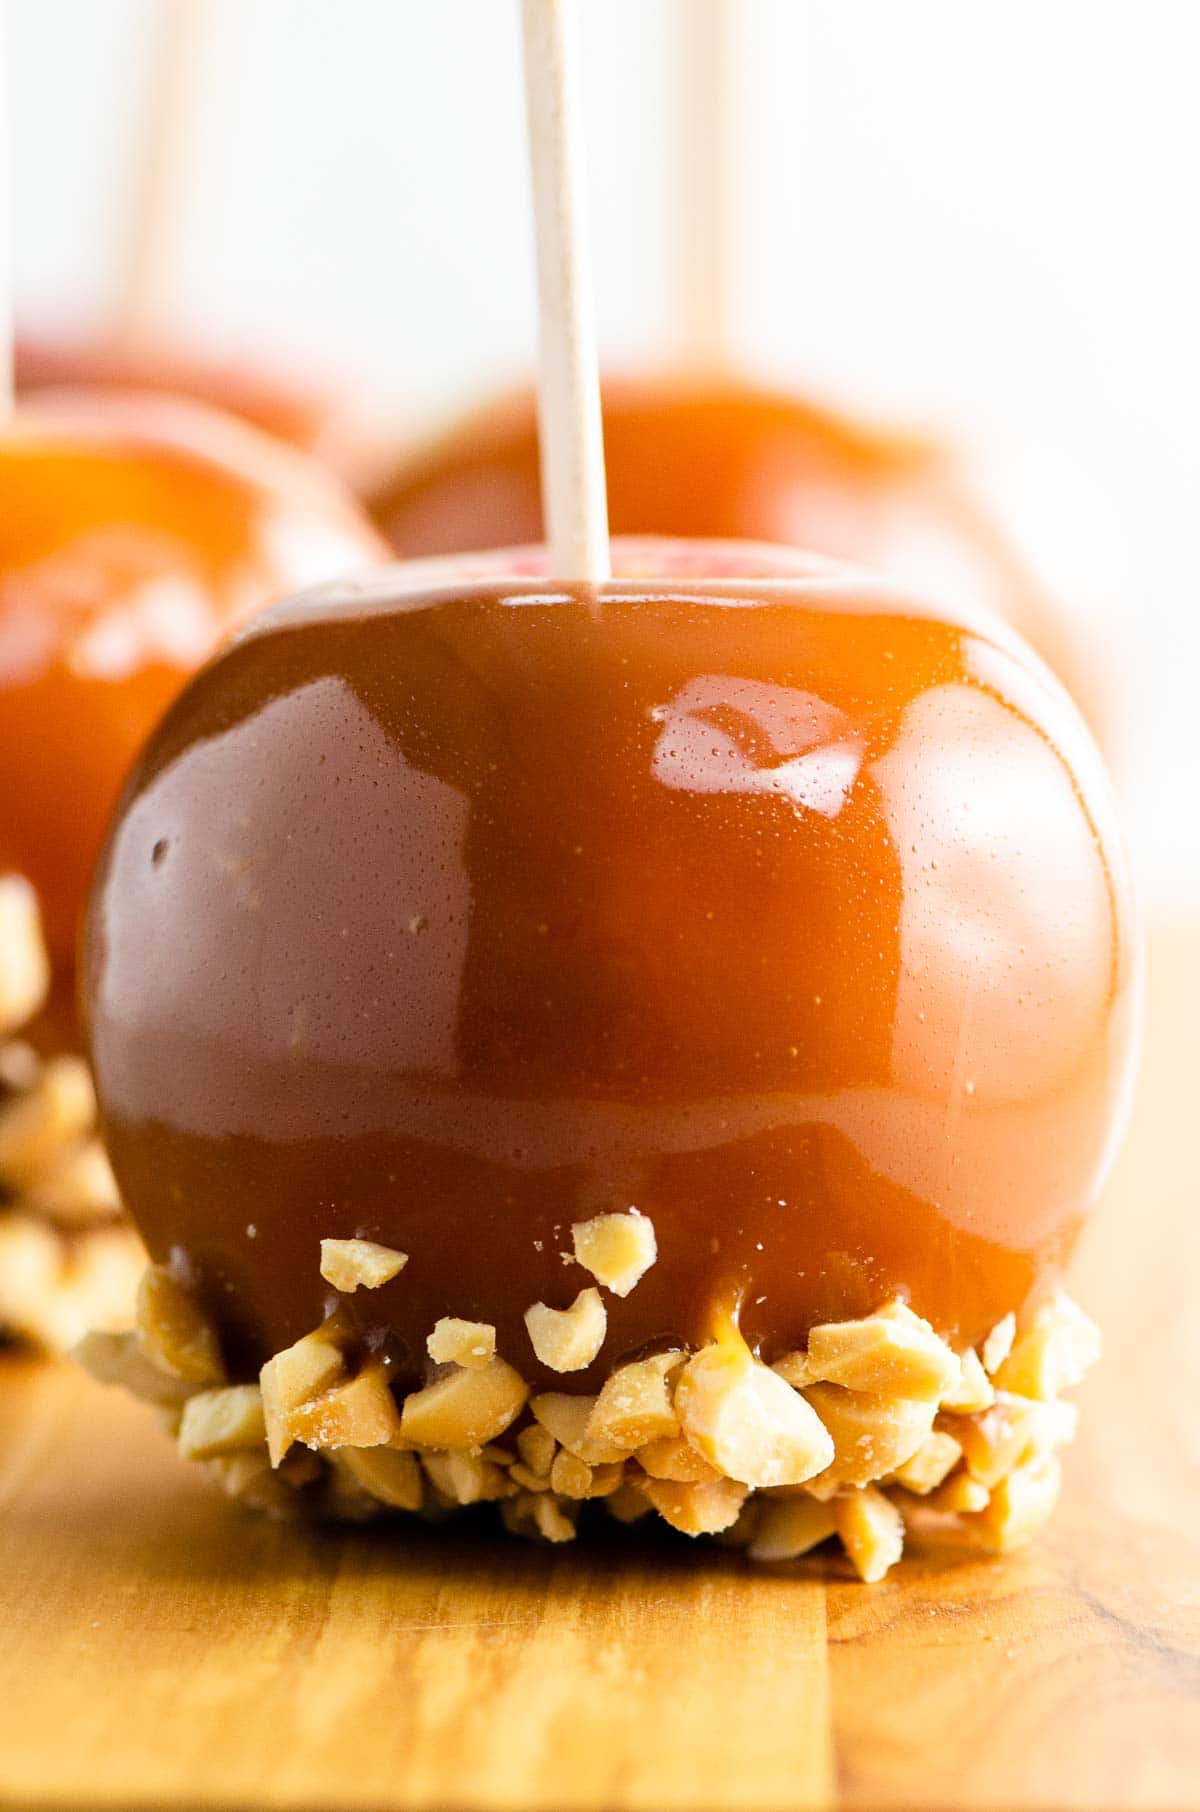
- Use nice small apples of a variety that’s got a great crispness and tartness. I’ve pictured Honeycrisps here since that’s what I had on hand. They’re a fine choice — a little bit tart and nice and crisp — but my favorite variety to use for caramel apples is good old Granny Smiths.
- The savory crunch of chopped roasted, salted peanuts is classic. But depending on your preferences, you can use whatever you like, from different nuts to small candies, or skip this element altogether.
How to make them
Here’s what you’ll do to make a great batch of homemade caramel apples. You can see all the steps in action in the video that accompanies this post, and get the full details in the recipe card below.
Start with refrigerated apples. The first step is to wash and dry the apples VERY well. Most apples sold in the U.S. these days are coated with wax, which will prevent the caramel from sticking to the apples. (Pick or buy unwaxed apples at a farm or farmers’ market if you have the chance.)
To wash, either use very hot water and a touch of dish soap and then rinse very well, or plunge apples one by one into a pot of boiling water for 5 seconds and then rinse very well. Dry completely.
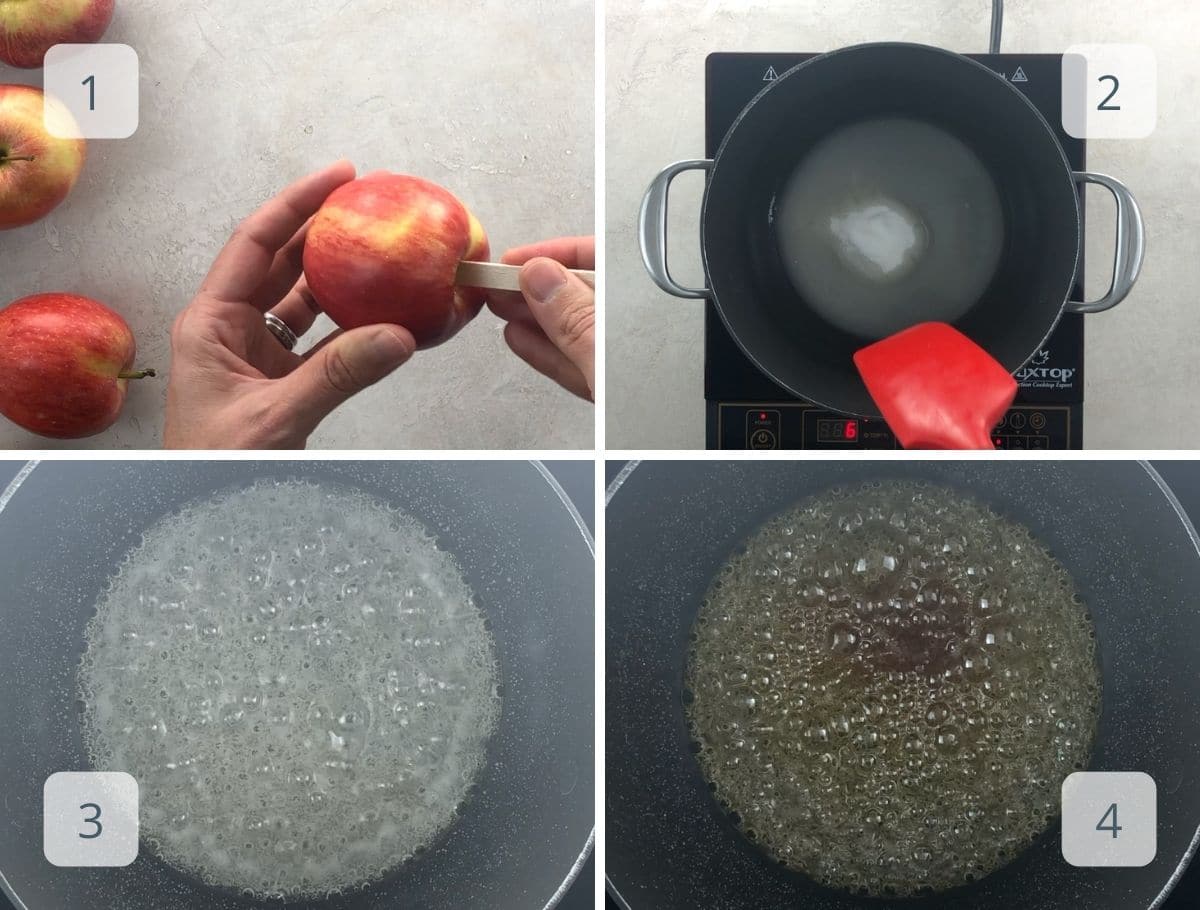
- Remove the stem from each apple and insert a popsicle stick, caramel apple stick, or twig about halfway. Return skewered apples to the fridge.
- Place water, sugar, and salt in an impeccably clean 3- to 4-quart pot. The pot will seem big, but that’s important because the caramel will bubble up like crazy when you add the cream later. In these photos, I’ve used a dark-colored pot (long story), but — especially if you’re new to caramel making — it’s best to use a stainless steel pot with a light color and a heavy bottom.
The heavy bottom distributes the heat well for even cooking, and the light color allows you to more easily see the changes in color as the syrup cooks. Stir until the sugar dissolves and then stop stirring. Bring to a boil. - Simmer without stirring at all. For quite a while, the syrup will stay clear and the bubbles will get bigger.
- Eventually — typically after about 8 to 10 minutes — the syrup will turn a medium-dark amber color. The color change happens relatively quickly, so keep a close eye on it. This is when you’ll move on to the next step.
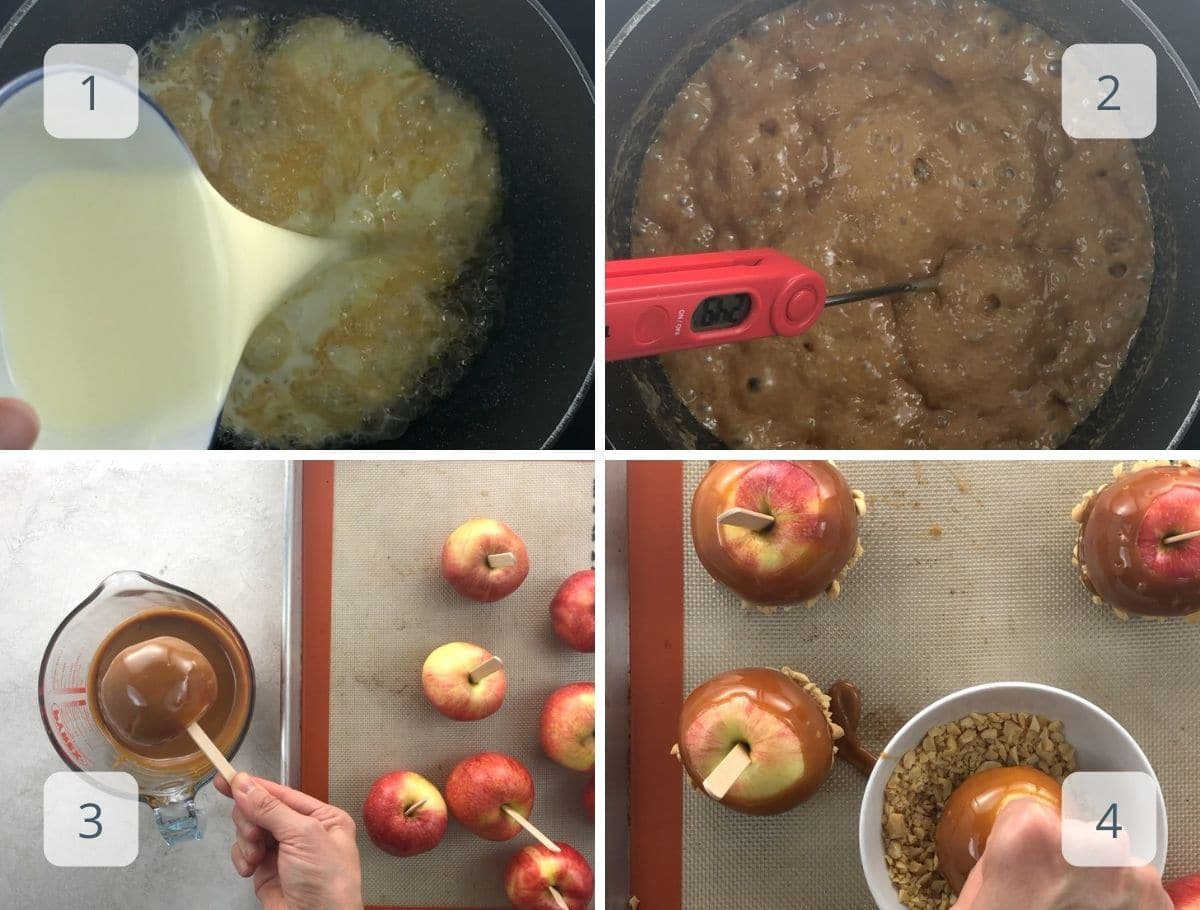
- Carefully pour in the cream. It will bubble up furiously.
- Cook, stirring from time to time, until the caramel reaches 250°F.
- Pour the caramel into a heatproof, microwave-safe glass measuring cup (if you like), and cool it to 212°F.
- Remove apples from fridge and dip and swirl in caramel, letting excess drip back into the cup. The caramel will cool quickly as you dip the apples, so work as quickly as you reasonably can. You can gently reheat the caramel in the microwave if it gets too cool before you’re done.
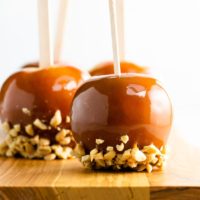
- When all apples are coated, roll the bottoms in chopped peanuts.
Expert tips and FAQs
Regular white sugar is the right choice for making caramel. It’s highly refined. You may be used to thinking of that as a bad thing from a nutritional perspective, but that lack of impurities is exactly what you want when trying to make a smooth caramel.
Nope, let me stop you right there. Without some expertise, candy-making is definitely not the place for your riffs and substitutions. It becomes art with enough knowledge and practice, but you’ve got to get the science right first. Stick to the recipe.
One exception: go nuts with the toppings (literally or otherwise). Chopped roasted, salted peanuts are a classic choice, but mini candies and different nut options can all make great caramel apples.
This doesn’t usually happen when making a “wet” caramel like this one (starting with water and sugar rather than just dry sugar). But if it did, it’s due to one of three factors.
Was your pot not perfectly clean? Did you stir the sugar syrup during the stage where it says not to stir? Did you use a type of salt that may have had additives?
Any of these situations could cause sugar’s microscopic crystals to collide and stick together.
Homemade caramel apples are best on the day they’re made, but if you have leftovers, you can store them in an airtight container at room temperature for a day or two. Just be sure they’re fully cooled first.
More favorite fall treats
Here are a few more of our favorite sweet treats for fall:
- Pumpkin whoopie pies
- Baked apple cider donuts
- Vegan pumpkin muffins
- Apple and goat cheese puff pastry tarts
- Apple crisp
- Olive oil pumpkin bread
- Healthy Halloween muffins
Summarize & Save This Content On
Homemade Caramel Apples
Ingredients
- 8 small apples, refrigerated
- ½ cup water
- 1 cup plus two tablespoons, (225 grams) sugar
- ½ teaspoon fine sea salt
- 1 cup (237 ml) (225 grams) heavy cream
- ½ cup chopped salted peanuts
Instructions
- Wash and dry the apples very well. (See notes below.)
- Pull the stems out of the apples and insert one end of a popsicle stick, caramel apple stick, or twig into the stem end, about halfway into the apple, depending on size. You want to leave enough of the stick available for gripping while also ensuring it’s firmly in place. Return the apples to the fridge until ready to dip.
- Line a baking sheet with a silicone mat (preferred) or with parchment paper sprayed with nonstick cooking spray, and set aside. If spraying with cooking spray, do NOT place the apples on this surface before coating with caramel.
- Spread chopped peanuts on a plate and set aside.
- Place the water, sugar, and salt into an impeccably clean 3- to 4-quart pot with a heavy bottom. Bring to a boil over medium heat, stirring constantly with a wooden spoon or heat-safe spatula until the sugar dissolves completely.
- When the mixture boils, stop stirring. Simmer undisturbed until sugar syrup takes on an amber color, about 10 minutes. (For a long time the mixture will be clear, and you’ll see the bubbles gradually get bigger. Once it starts to take on some color, the rest happens fairly quickly.)
- As soon as the syrup is a nice, medium-dark amber, carefully pour in the cream. The mixture will boil up furiously. Stir vigorously with a wooden spoon or heatproof spatula. Continue cooking, stirring from time to time, until the caramel reaches 250°F (121°C).
- At this stage you can choose whether to leave the caramel in the pot or pour it into a 2-cup heatproof glass measuring cup. Let the caramel cool to about 212°F (100°C).
- One at a time, hold each apple by the stick and swirl to coat in the caramel. Let excess caramel drip back into the cup or pot. The caramel will cool quickly, so work as fast as you reasonably can. Place each apple on the prepared baking sheet. See notes below about reheating if necessary.
- Roll the base of each caramel-coated apple in chopped nuts. Set each apple back on the baking sheet to cool completely.
Notes
- You will need an instant-read thermometer or a candy thermometer.
- I prefer crisp, tart Granny Smith apples for this recipe, because their flavor and texture provide perfect counterpoints for the sweet, sticky caramel. But you can use any small apples that you like. (As you can see from the photos and video, I don’t always use Granny Smith! These were some diminutive Honeycrisps that we had on hand.)
- It is VERY important that you wash the apples well (or buy unwaxed apples if you can find them at a farm or farmers’ market) and dry them completely. Most apples sold in the US these days have a wax coating that will prevent the caramel from sticking. You can wash them well in very hot water (I usually do this and use a dab of dish soap for good measure, then rinse extremely well), or you can plunge each apple into boiling water for 5 seconds and then rinse very well (I find this to be more of a pain, so I don’t usually do it this way).
- Salt choice is important here. Don’t use table salt, because it can contain impurities that will cause your caramel to seize or become grainy. Fine sea salt works well, and the usual brands of Kosher salt should be fine, too.
- A 3- to 4-quart pot will seem large, but it’s necessary because the caramel will bubble up furiously when you add the cream.
- Using a big pot should keep you safe, but it’s also a smart idea to keep a little bowl of ice water on hand when working with boiling-hot sugar. If you happen to graze a fingertip or two into the heat, you can quickly plunge it into the water to cool it quickly.
- In the video, I’ve used a dark-colored pot (long story), but that’s not the best choice, especially for beginners. If possible, use a stainless steel pot without a dark finish. The heavy bottom will help cook the caramel evenly, and the light color of the pot will make it much easier to judge the color of the caramel as it cooks during the first stage.
- I prefer to pour the caramel into a 2-cup heatproof glass measuring cup to cool. I find this shape and depth makes it easiest to coat the apples, and the glass can be microwaved if you need to reheat the caramel.
- The caramel will cool quickly as you dip the cold apples into it. If it gets too cool before you’re finished dipping, you can rewarm it gently in the microwave or on the stovetop.
- Apples are best on the day they’re made — but, once completely cooled, can be stored in an airtight container at room temperature for a day or two.
Nutrition
Nutrition information is automatically calculated, so should only be used as an approximation.


Turned out great, even better than I thought and happy to have avoided using any corn syrup.
Was a bit worried after seeing some of the other comments, but I followed the recipe as described and used the photos for reference. Everything went smoothly. The flavor and texture were great.
My only issue was that it wasn’t quite enough caramel for the number of apples I was using (6). Might be that I let it thicken a bit too much in the final stage before cooling so it stuck onto the apples in a pretty thick layer (which I liked actually).
I would double the recipe and buy more apples. Worst case you eat any left over apples without caramel in the following days.
I was shocked to see so many other recipes using corn syrup, condensed milk and all kinds of other ingredients. Very happy with this recipe which uses simple ingredients, they’re all you need.
So glad, Rob. Thanks for the comment.
I’m looking to do a caramel apple making and decorating event. Would it be possible to pre make these with them staying sticky enough for the kids to decorate them
Hi Gweniver, that’s fun that you’re doing an event! That’s a tall order to keep caramel sticky enough to decorate without having it drip off the apples. Whichever recipe you end up using, I’d recommend keeping the caramel warm in something like a small crock pot or candy melting pot and helping the kids dip the apples shortly before decorating.
Didn’t work for me.. followed directions, took a bit of my time and didn’t work. Darn!
Hi Tonya, caramel can be tricky for sure. If you want to say more about what you experienced, I’m happy to help troubleshoot.
I won’t rate your recipe because I tried it and It didn’t work out. I think the problem is in the simmer. I’ve made caramel and caramelized sugar in other recipes. And it is never to a simmer. After 10 to 15 minutes there was simply no color to the liquid but it started to evaporate. I worried I wouldn’t have enough sugar syrup to make caramel. I cooked the syrup for another 10 minutes with still no change in color and I wish I could post those pictures here. As the syrup noticeably reduced but turned a light yellowish hue I took a chance and added my cream. Nothing ?. So it was a complete fail for me. I will say it’s an easy enough recipe and process but that syrup cooked way too long at a simmer, about 35 minutes in all.
Thanks for the feedback. It’s challenging (i.e. impossible) to communicate a recipe perfectly to all cooks with words, which is why I also include a video and step-by-step photos in every recipe. If you brought it to a boil first per the instructions, then the answer is just that you needed to turn up the heat a bit to simmer more briskly. I’ll think about whether there’s a way to tweak the language.
Hi there. My mom and I followed the recipe exactly as it was, but the caramel ended up being so runny, it never hardened, and everything just slide right off the apples. I don’t know where we went wrong or why it didn’t work for us but it was certainly frustrating. I was really disappointed with the outcome.
Hi Claudia, if the caramel was too runny, you either didn’t cook it long enough or didn’t let it cool long enough. In addition, as noted in the recipe, it’s important to use unwaxed or very well-washed apples — otherwise even correctly-thickened caramel can slide right off.
Great recipe! I made the caramel and followed the recipe, then let the apple harden in the fridge. It was a little hard to bite so I ended up cutting off a slice and then biting the rest. For some reason, my caramel started to gain colour on only one side. I tried rotating the spot, but it still burned giving the caramel a slightly odd flavour.
Hi, Bianca, sorry to hear that about the uneven cooking. It likely comes down to your burner heating unevenly (many do!) and/or the pot not having a heavy enough bottom to distribute the heat well. Hope you enjoyed them anyway. 🙂
Can you use condensed milk instead of cream for this recipe?
Hi, Katt, I haven’t tried that substitution. Condensed milk is a whole lot sweeter than cream — something like half its total weight is sugar content. So if you do try it, I’d recommend reducing the sugar in the recipe.
Can you double or triple this recipe?
Hi, LisaAnn! Yes, you can. Just be sure to use a bigger pot than you think you need, because the caramel will bubble way up when you add the cream. You’ll also likely need to reheat the caramel a bit to keep it workable if you’re making 2-3x the apples.