Cooking a free range turkey doesn't have to be complicated. Here's how to roast a gorgeous bird for Thanksgiving and decorate a turkey platter with minimal fuss.
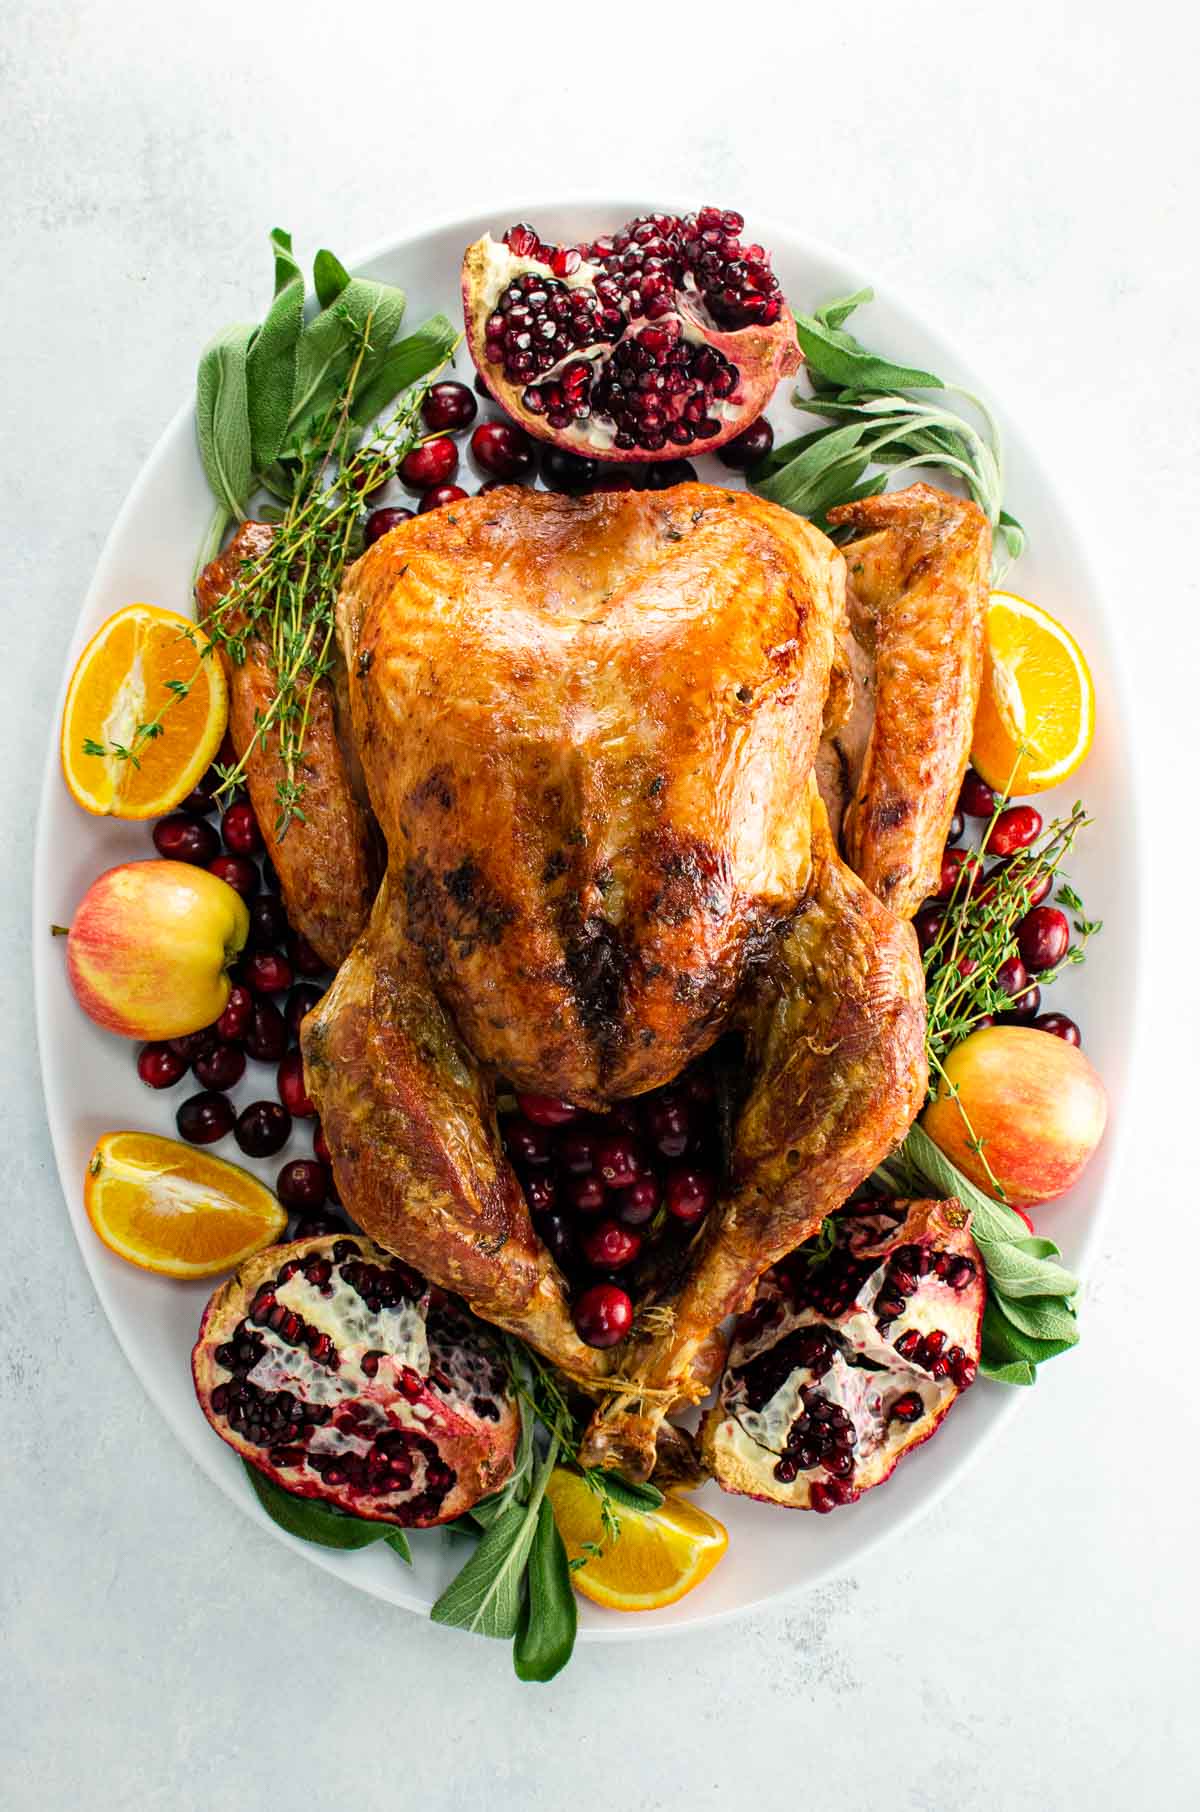
Why this recipe works
Even as a trained professional, I'm sometimes tempted to be intimidated by the idea of cooking a whole turkey. As a society, we've way overcomplicated the culinary narrative, from brining to spatchcocking to the dreaded deep-frying. No shade to those who enjoy the sport of it all, but I'm here to say that you can cook a gorgeous turkey without doing ANY of those things — or even changing the oven temperature during cooking.
Our method takes what's important and leaves the rest. It:
- Starts with a good-quality bird that's not too big (you can cook two side by side to feed a very large crowd)
- Leaves the dressing on the side
- Uses a quick and easy compound butter to help keep things juicy and flavorful
- Keeps the trussing simple
- Yields a lovely result without added stress — because who needs more stress on Thanksgiving?
We take the same approach to the platter as we do to the bird. It's gorgeous, but it's truly easy.
What you'll need
Here's a glance at the ingredients you'll need to cook a free range turkey.
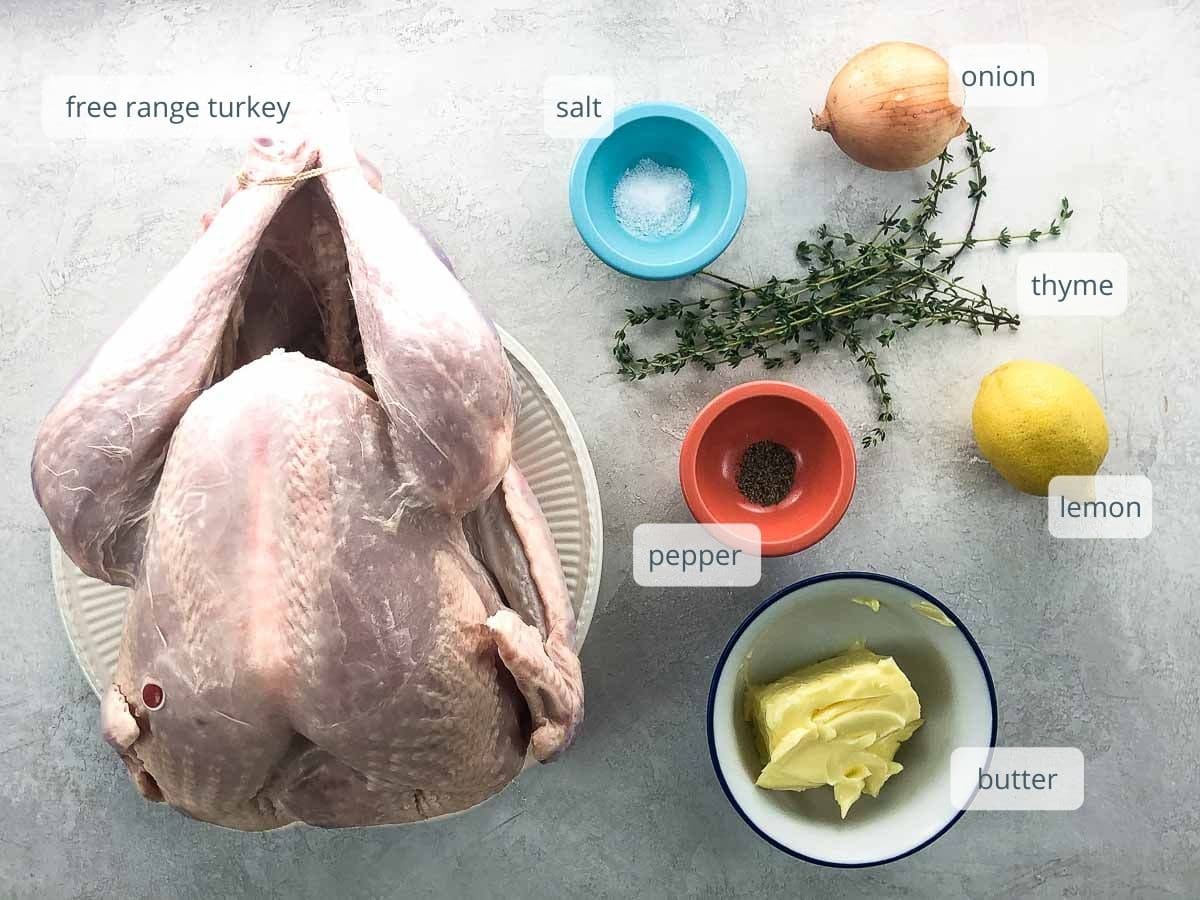
- Start with a good-quality bird that's not too big. See the section below for lots more information on how to choose a turkey.
- A good butter goes a long way. I use a salted, cultured butter for maximum flavor. Make sure it's at room temperature before you start.
- Thyme is a no-brainer with turkey, but you can add any other herbs you like. Rosemary and sage would be great, among many others.
How to choose a turkey
You can use our roasting method with a standard-issue supermarket turkey if that's what you've got. But here's how to go about choosing a better bird.
- Avoid factory farmed turkeys. Ethics aside, these birds tend to lack interesting flavor, have been injected with saline (which doesn't taste fresh and can inhibit browning), and have been dosed with antibiotics and growth hormones.
- Look for free-range, all natural, additive-free birds. Organic certification is great, but it can also be prohibitively expensive for smaller farmers. Some farms use excellent organic or organic-leaning practices but don't have the certification. When in doubt, ask.
- Buy a turkey that's between 10 and 14 pounds. It will cook in a reasonable amount of time at a reasonable temperature, and the white and dark meat will both cook within approximately the same time frame without any next-level techniques. Consider cooking two birds side by side if this size isn't big enough for your crowd, rather than sizing way up.
- A note about heritage turkeys: They're wonderful, but they tend to be different enough from a regular free-range turkey that you'll want to cook them differently. They benefit from a higher cooking temperature and shorter time in the oven. You can learn more here if you like.
My favorite sources for meat & pantry staples
For years, I've been sourcing our meat from ButcherBox. We love this curated meat delivery service, which provides grass-finished beef, heritage breed pork, organic chicken, and more from small farms direct to the customer. You can learn more in my extensive Butcher Box review and unboxing.
I love Thrive Market for a wide variety of products. Often described as one part Whole Foods, one part Costco, they're a membership-based online market for healthier products at discounted prices. Plus, they're mission-driven, engaged in the community, and not currently owned by a giant corporation. You can learn more in my Thrive Market review and unboxing.
How to defrost and prep a turkey
There's no getting around the fact that cooking a free range turkey involves a little bit of advance planning — but it doesn't need to be too hard.
Defrosting
If you have plenty of time, the best way to defrost a turkey is to let it sit in the refrigerator over a period of days. A good rule of thumb is to leave a full 24 hours for every five pounds of frozen turkey (so three days for a 10 to 14 pound bird).
I sometimes find it takes even longer to ensure that the inside is fully thawed. If you plan to roast the turkey on Thursday morning (Thanksgiving Day), transfer it from freezer to fridge during the preceding weekend.
If you're short on time and have a big sink or cooler, you can defrost a turkey in cold water. Consider using a laundry sink if you have one so you won't be in your own way. Place the turkey in the sink or cooler, plug the drain, and fill with cold water to cover. Change the water every 30 minutes. With this method, you'll need to allow about 30 minutes per pound, so a 10- to 14-pound turkey will take somewhere in the neighborhood of six hours to defrost.
Prepping the bird
What sounds like an unfortunate euphemism is actually just a few simple steps.
- Remove all the naughty bits from inside the cavities. You'll likely find a neck and a bag of giblets. Sometimes they're both in the large main cavity, but sometimes the bag is in the smaller neck cavity around the other side. Don't miss it.
- If there are any pin feathers still on the bird, pluck them out.
- Unless you've brined your turkey, do NOT rinse it. Buying a good-quality bird, defrosting it safely, working with clean hands, and cooking it properly are all you need to do. Rinsing does a better job of spreading bacteria than removing it.
How to make it
Here's what you'll do to get the bird in the oven without an ordeal. You can see all the steps in action in the video that accompanies this post, and get all the details in the recipe card below.
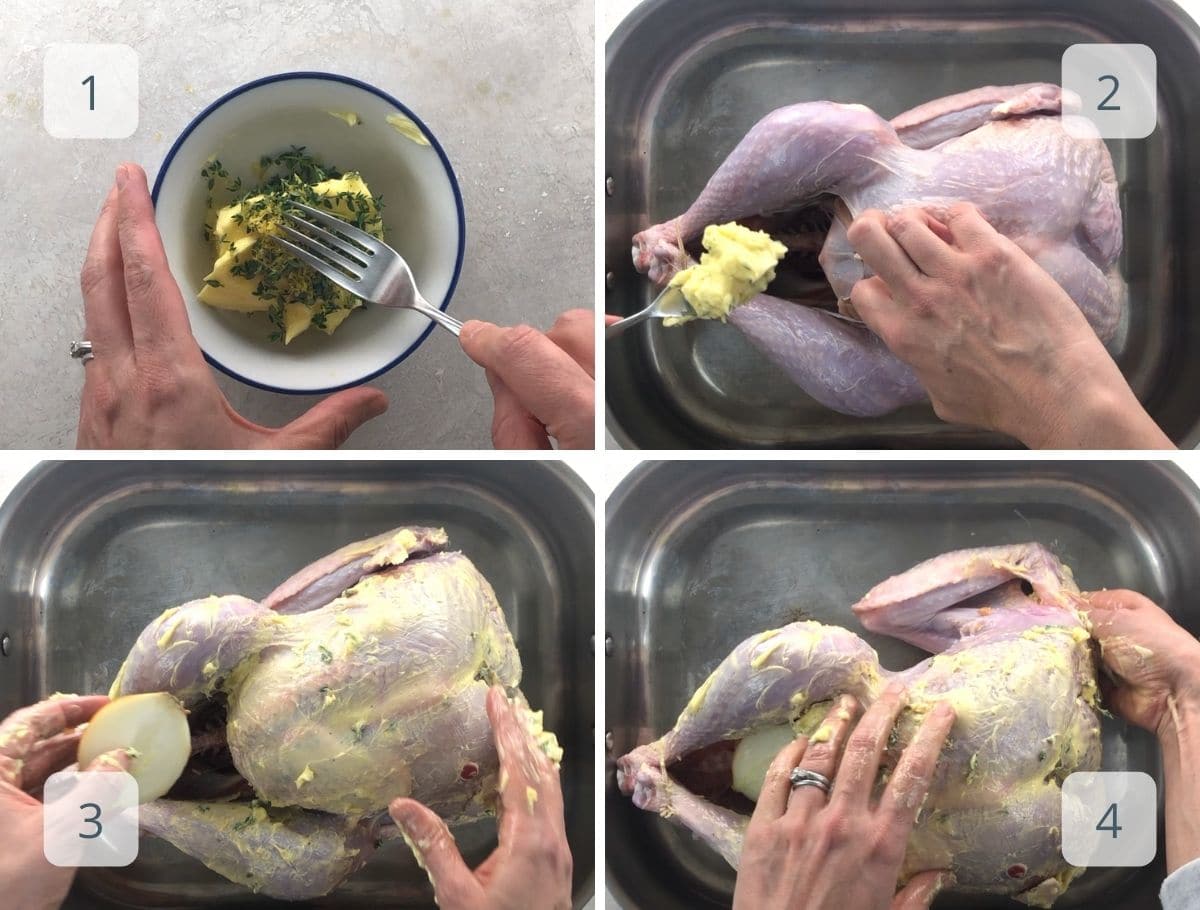
- Place the turkey breast-side up into a large roasting pan. No racks or fancy positions necessary. Place room-temperature butter into a small bowl and use a fork to mix in the salt and pepper, lemon zest, and thyme leaves.
- Use your fingers to carefully separate the skin from the breast meat to create pockets. Tuck some of the compound butter into the pockets and distribute it over the breast by wriggling it in as best as possible. Spread the remaining compound butter all over the outside of the turkey.
- Halve the lemon and the onion (quarter if very large) and place into the cavity along with a small handful of fresh thyme.
- To truss, tuck the tip of each wing under the bird and tie the tips of the drumsticks together with a small piece of twine if this isn't already done. No need for fancy techniques. The turkey is ready to be roasted.
Turkey cooking times and temperatures
For a free-range turkey that's 10 to 14 pounds, I like to roast at 350°F (177°C). This temperature yields a nice combination of golden skin and nicely cooked white and dark meat without unnecessary fuss.
Position the top rack in the bottom third of the oven and preheat. That's it.
There is no need to baste a turkey. It doesn't contribute to moistness. It can help the turkey skin brown evenly, but I find that a turkey rubbed with compound butter and roasted at 350°F doesn't need any help getting evenly brown — and leaving the oven door closed cuts down a little bit on cooking time.
There is also no need to rotate the turkey during cooking unless you know that your oven cooks in a particularly uneven way.
First things first. Ovens vary. Rather than blindly following a timing chart, the best thing you can do is make a small investment in an instant-read thermometer and learn how to use it. Here's a GREAT video that shows exactly how to use an instant-read thermometer to check the temperature of your turkey in the three critical places.
That said, in my oven an unstuffed 10-pound bird tends to take more than two hours but less than two and a half. A 14-pound turkey will probably take more than two and a half hours but less than three.
The U.S. Government recommends cooking breast meat to 165°F before taking the turkey out of the oven. Some people (myself included) prefer to take it out earlier. I aim for between 155 and 160°F. As long as you let the turkey rest for 30 minutes before carving — which you should — any temperature reading over 150°F will result in meat that's safe to eat. Beyond that point, it's a matter of preference.
Yes yes yes. Let it rest for at least 30 minutes. This gives the meat a chance to reabsorb its juices, and conveniently it also gives you a chance to make sure the rest of the meal is ready.
How to decorate a turkey platter
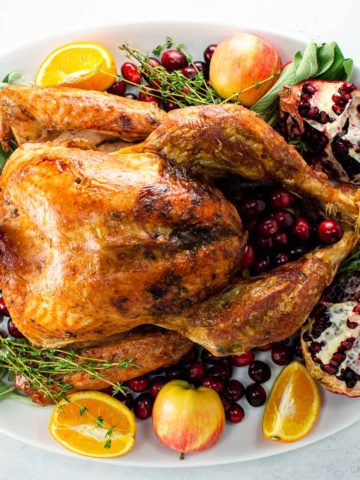
A gorgeous platter does NOT need to take a lot of time or effort. Here's all you need to do to decorate a turkey platter. You can use this technique whether you plan to present the whole bird at the table or carve it before plating (my Thanksgiving-day preference, as opposed to when I'm styling photos).
As with cheese platters and fruit platters, the name of the game is layering and creating a feeling of abundance. Keep those principles in mind, and the rest is up to you.
What you'll need
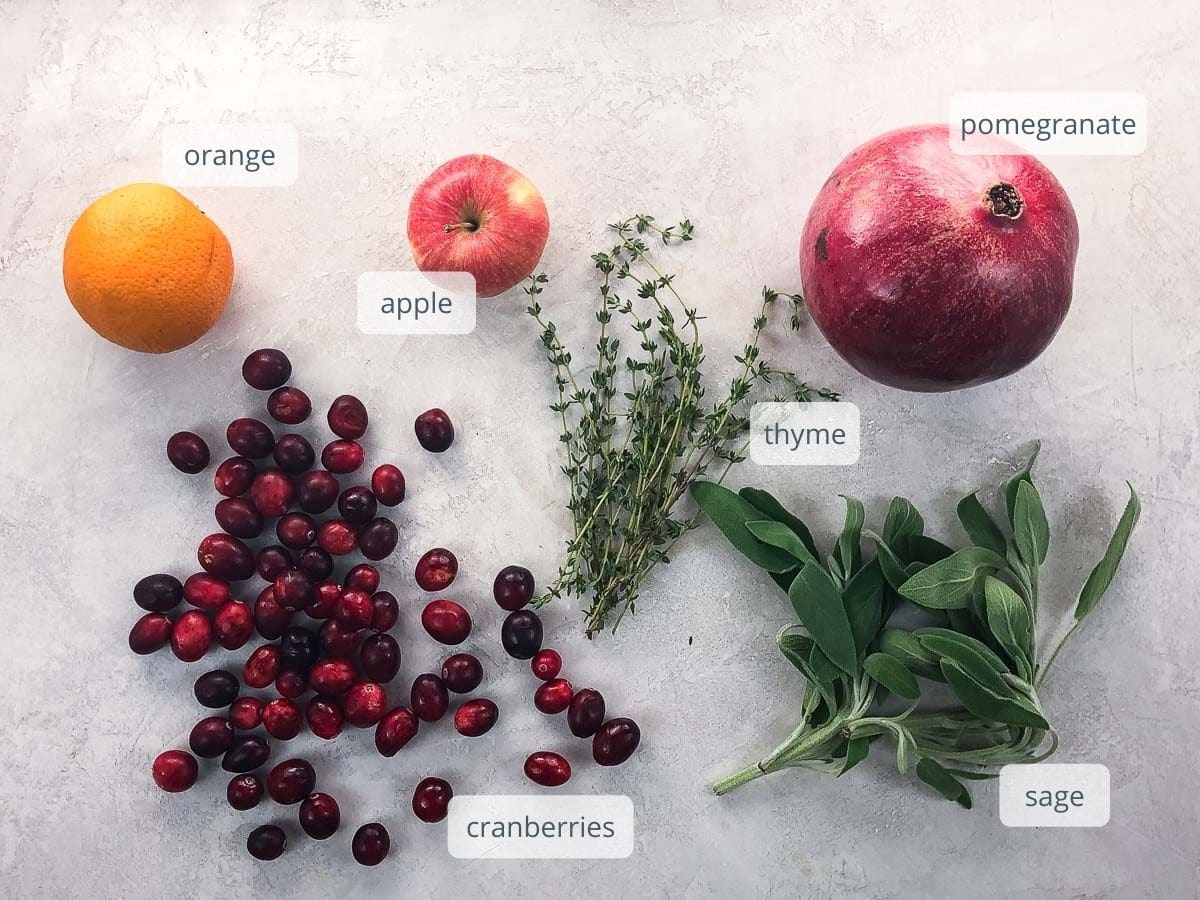
I like to lean into the fall colors and flavors — the muted green of herbs like sage, thyme, and rosemary; the deep red of cranberries and pomegranate; and some gorgeous orange. Ingredients in a variety of sizes, shapes, and textures create interest without any additional work. You can use exactly the items pictured here, or use this general idea to riff on your own.
What you'll do
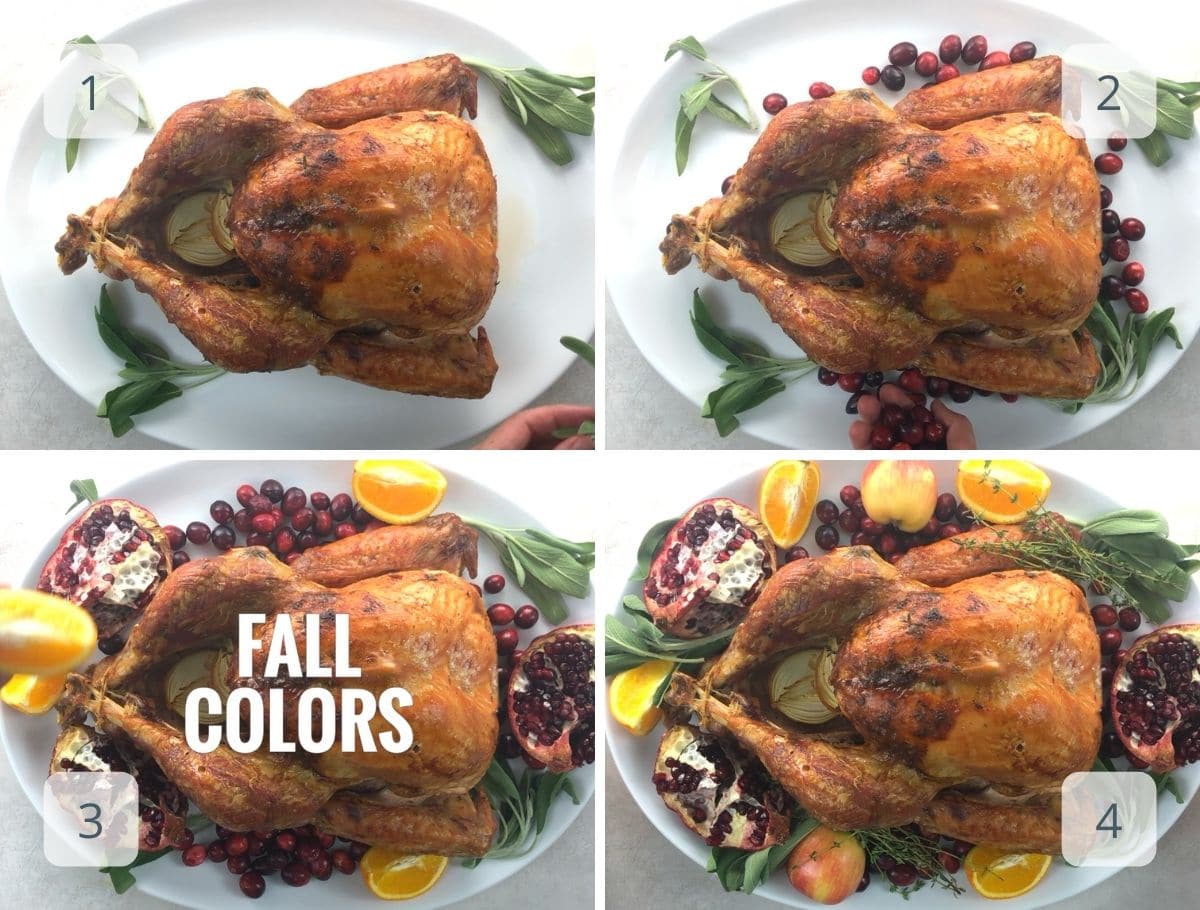
- Arrange the whole or carved turkey on a large oval-shaped platter with a little bit of a lip around the edge, leaving room around the margins. (This is the platter I use — we have two, and I often pile the vegetable side dishes on the other one.) Layer on some green. I've used sage here, but anything from fresh bay leaves to curly kale could work nicely.
- Add some smaller fruits and/or nuts between the greens. Cranberries, grapes, whole chestnuts or walnuts (if you don't have nut allergies in your crowd) work well.
- Add a layer of larger fruit pieces. I love using a pomegranate that's been torn into four rustic-looking pieces, along with a navel or blood orange or two, and a red or green apple.
- Keep layering and filling in gaps until you're happy with the result. That's it! And you can encourage folks to eat the cut fruits if they like. Herbs can sometimes be saved to cook with, depending on how they look at the end of the day.
Top five classic Thanksgiving sides
- Perfect mashed potatoes
- Classic or cornbread stuffing
- Haricots verts
- Cranberry sauce
- Popovers
- And don't forget the vegetarian gravy or make-ahead gravy
- Or head straight to my Thanksgiving must-haves
What to do with leftover turkey
- Pot pie!
- Soup
- Sandwiches
- Use the carcass for stock
Hungry for more?
Subscribe to Umami Girl's email updates, and follow along on Instagram.
Equipment
Ingredients
- 1 free-range turkey (10 to 14 pounds)
- 8 tablespoons cultured (salted butter at room temperature)
- Small handful thyme sprigs
- 1 lemon (zested and halved)
- 1 onion (halved or quartered if large)
- ½ teaspoon fine sea salt
- ¼ teaspoon freshly ground black pepper
Instructions
- Preheat the oven to 350°F with the top rack in the lower third of the oven.
- Remove the neck and the bag of innards and giblets from inside the cavities. Sometimes they’re both in the large main cavity, but sometimes the bag is in the smaller neck cavity around the other side.
- If there are any pin feathers still on the bird, pluck them out.
- Place the turkey breast-side up into a large roasting pan. No racks or fancy positions necessary.
- Place butter into a small bowl. Strip one teaspoon of leaves from the thyme and add it to the bowl, reserving the rest. Add the salt, pepper, and lemon zest, and mix it all together thoroughly with a fork.
- Use your fingers to carefully separate the turkey skin from the breast meat to create pockets. Tuck some of the compound butter into the pockets and distribute it between the skin and the breast meat by wriggling it in as best as possible. Spread the remaining compound butter all over the outside of the turkey.
- Place the lemon and onion pieces into the large cavity of the bird along with a the remaining thyme sprigs.
- To truss, tuck the tip of each wing under the bird and tie the tips of the drumsticks together with a small piece of twine if this isn’t already done.
- Place turkey into oven and roast to your desired level of doneness. For me this means that an instant read thermometer inserted into the deepest part of the breast should read 155-160°F. Refer to the notes section below to learn more. A 10 pound turkey will probably need between 2 and 2 ½ hours. A 14 pound turkey will probably need between 2 ½ and 3 hours.
- Remove turkey from oven and let rest for at least 30 minutes before carving.
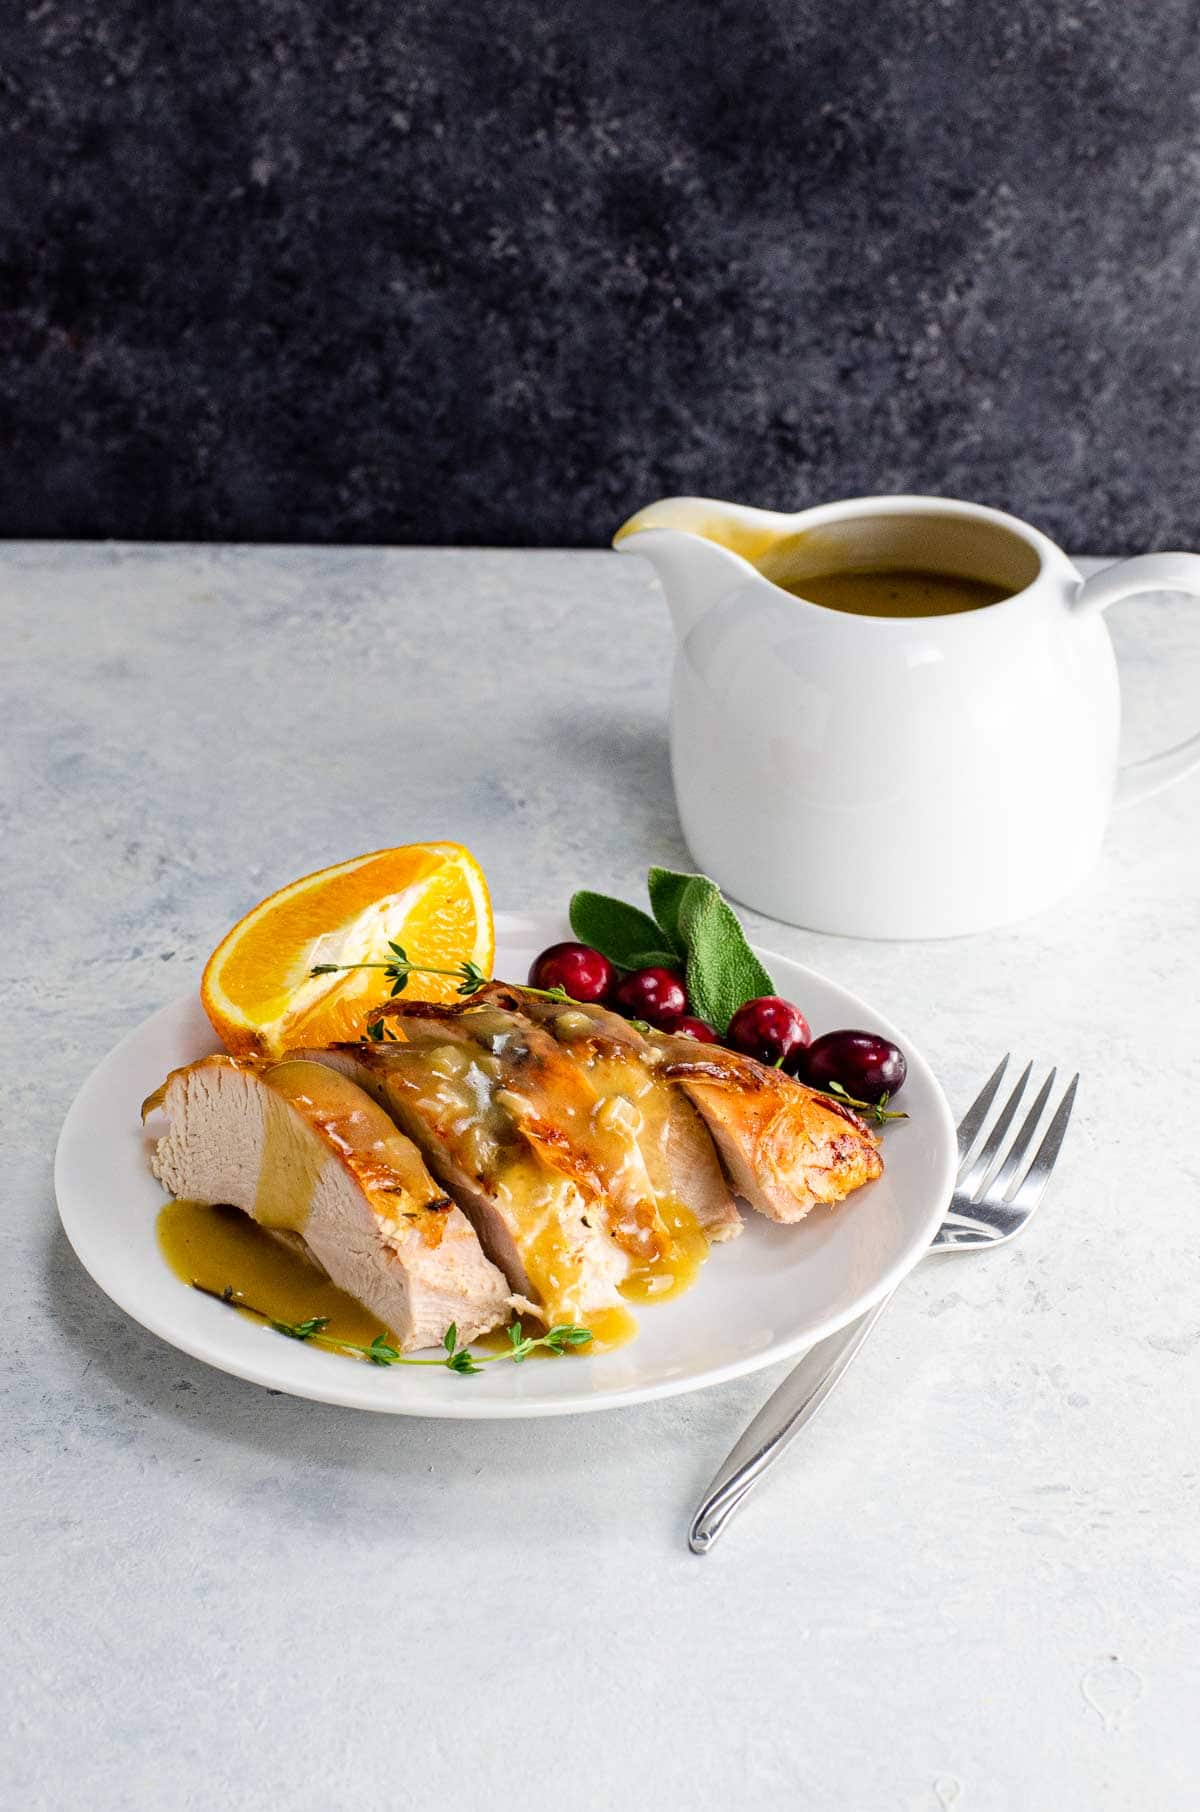
- How to make gravy from pan drippingsIf you like, you can make gravy right in the roasting pan while the turkey rests. Here's what to do.
- Set the roasting pan with the drippings over medium heat on the stovetop. Depending on your stove and the size of the pan, sometimes it's best to do this over two burners, sometimes one.
- Estimate the amount of drippings in the pan. If it seems vaguely like ½ cup, you're all set. If it seems like a lot more, spoon some out. If it seems like a lot less, add some butter and let it melt.
- Sprinkle in ½ cup flour and stir vigorously with a sturdy whisk or a wooden spoon, scraping up browned bits from the bottom of the pan and incorporating the flour into the fat to form a roux. Cook for a minute or so, stirring constantly.
- Pour in 8 cups chicken broth or turkey stock (or seven cups stock and one cup dry white wine). Bring to a boil, stirring constantly.
- Reduce heat and simmer, stirring frequently, until thickened to your liking.
- Taste for seasoning and then ladle into a gravy boat to serve.
Notes
- Unless you’ve brined your turkey, do NOT rinse it. Buying a good-quality bird, defrosting it safely, working with clean hands, and cooking it properly are all you need to do. Rinsing does a better job of spreading bacteria than removing it.
- There is no need to baste a turkey. It doesn’t contribute to moistness. It can help the turkey skin brown evenly, but I find that a turkey rubbed with compound butter and roasted at 350°F doesn’t need any help getting evenly brown — and leaving the oven door closed cuts down a little bit on cooking time.There is also no need to rotate the turkey during cooking unless you know that your oven cooks in a particularly uneven way.
- Ovens vary. Rather than blindly following a timing chart, the best thing you can do is make a small investment in an instant-read thermometer and learn how to use it. Here’s a GREAT video that shows exactly how to use an instant-read thermometer to check the temperature of your turkey in the three critical places.That said, in my oven an unstuffed 10-pound bird tends to take more than two hours but less than two and a half. A 14-pound turkey will probably take more than two and a half hours but less than three.
- The U.S. Government recommends cooking breast meat to 165°F before taking the turkey out of the oven. Some people (myself included) prefer to take it out earlier. I aim for between 155 and 160°F. As long as you let the turkey rest for 30 minutes before carving — which you should — any temperature reading over 150°F will result in meat that’s safe to eat. Beyond that point, it’s a matter of preference.
Hungry for more?
Subscribe to Umami Girl's email updates, and follow along on Instagram.





marcy says
i have never 'left a comment'. as an 'ol momma of 4 very
adult sons, three belle-filles, (& 5 g'kids under 8), and all have
been vegetarians since HS years.(25+ yrs) (all into organic;'Green',
agro-forestry, permaculture, low-impact, et al: all good. you can see
why i am 'bound' to change MY ways of past!
your details are exceptional, photos a great addition, and your
ability to write well, explicitly, is to be admired!
i have ordered an organic 14lb/er for Christmas and plan to follow
your recipe/presentation, smack down to the pan gravy (as i recall my
own mother did, but using only pan juices & water. i will do your's!
thank you for making me feel more comfortable as i (w/ my husband of
50+ years, help), roast our first turkey in 45 years! (chili as side dish!)
happy holidays to you and 'your's'...marcy
Carolyn Gratzer Cope says
Thank you so much for the lovely comment, Marcy! Hope you have a wonderful holiday.