
This post may contain affiliate links. Learn more.


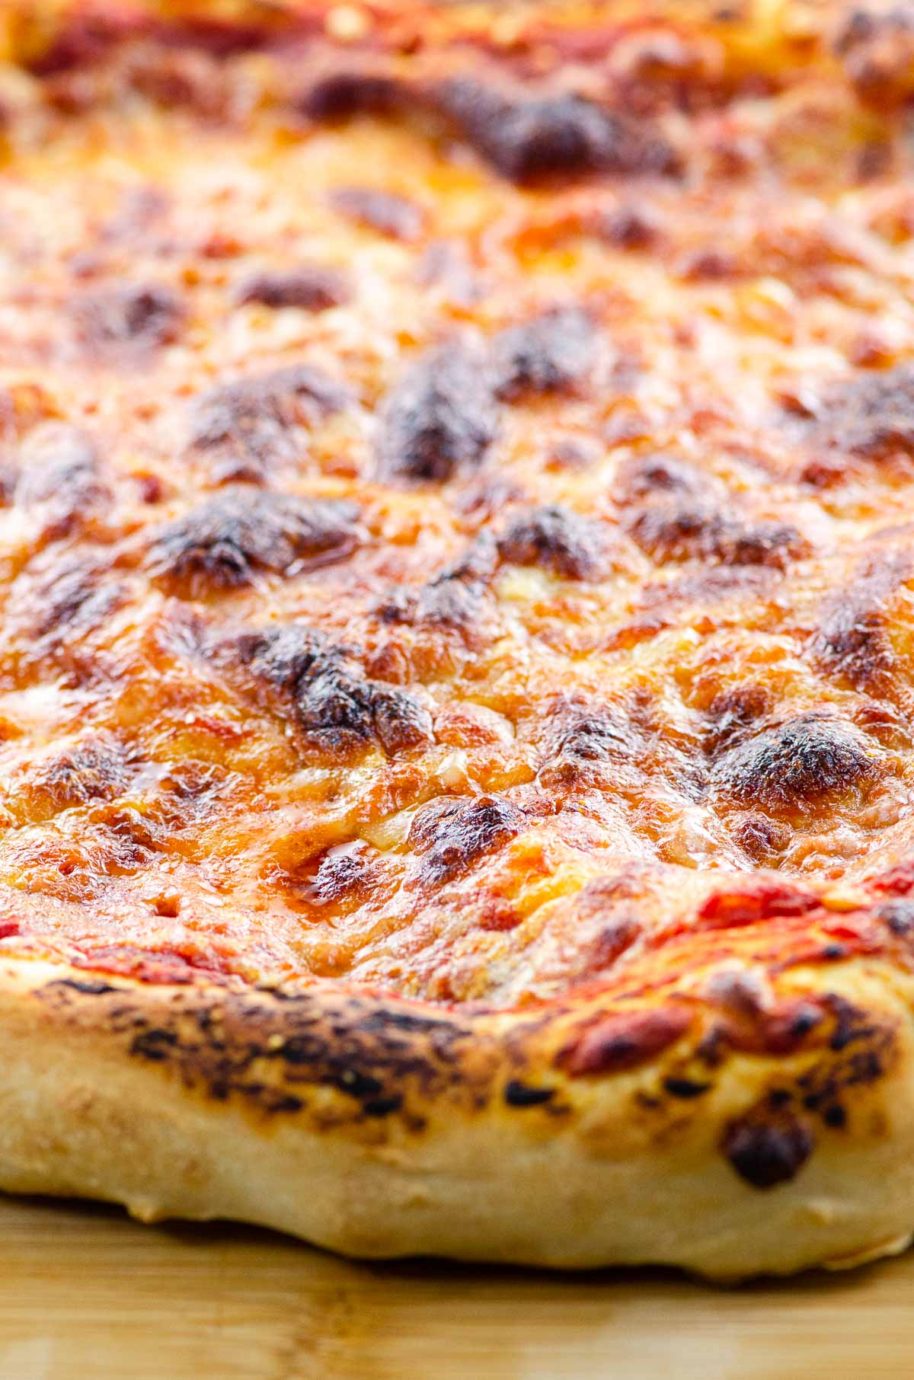
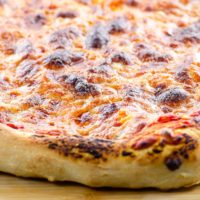
Elevate your homemade pizza with the perfect New York crust. This New York pizza dough recipe yields a tender chew and just the right thickness for topping. And it’s easy, promise! Here’s how to do it.
Why this recipe works
As a native of the tri-state area, New York-style pizza crust will always be my favorite. It’s based on classic Neapolitan thin crust, but has a few additional things going for it. This recipe:
- Has the perfect amount of tender chew
- Holds up to topping, but is still foldable
- Loves all the pizzas YOU love (top it any way you want, and it’ll fit right in)
New York crust browns beautifully due to the hint of sugar, and olive oil keeps it supple and tender. I’ve been making this recipe weekly for a LONG time, tweaking it to perfection. I’m so glad to finally share it with you.
What you’ll need to make this recipe
The dough comes together with just a few ingredients. Here’s what you’ll need:
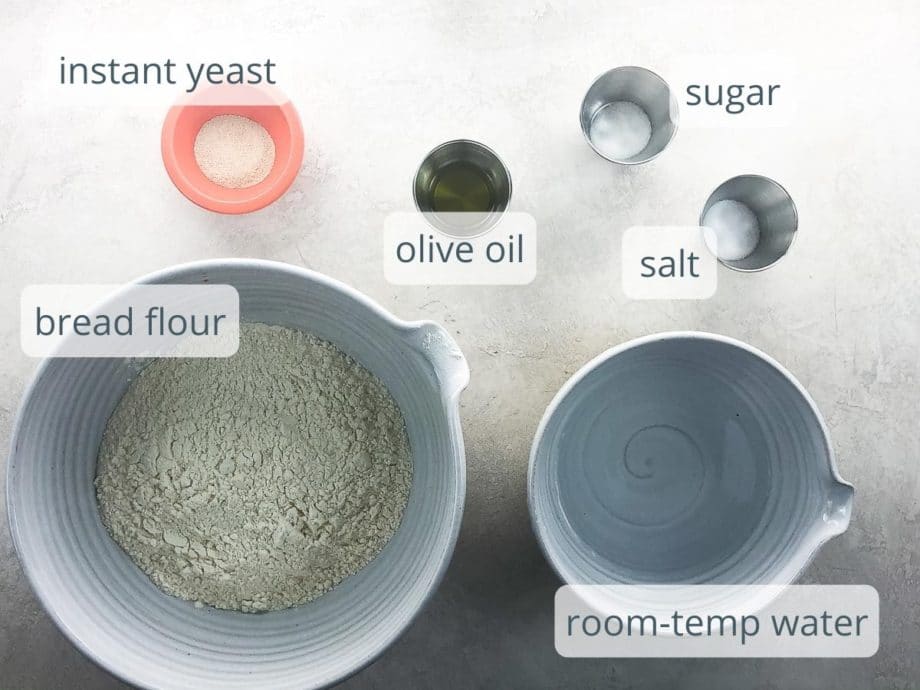
- Bread flour has a higher protein content than all-purpose flour, which gives the dough its strength and perfect chewiness
- Instant yeast is different from active dry yeast. They look about the same, but the instant variety doesn’t need to be mixed with water to activate it.
- Use salt that isn’t iodized and doesn’t have additional additives that might interfere with yeast fermentation. I use fine sea salt.
How to make it
Here’s all you need to do to make New York-style pizza dough. You can see all the steps in action in the video that accompanies this post.
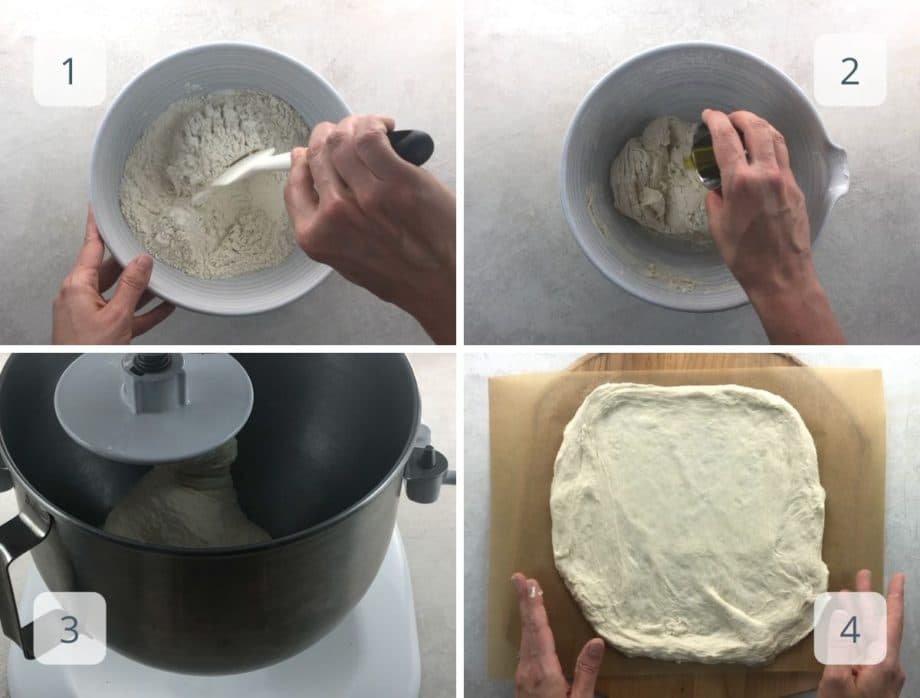
- Mix together the dry ingredients. Make sure that the yeast, sugar, and salt are well-distributed throughout the flour.
- Mix in the water until all the flour is hydrated. Then mix in the olive oil.
- Knead for 10 minutes in a stand mixer with the dough hook or by hand.
- Let the dough rise in the fridge for at least 24 hours, up to 72.
Equipment
You don’t really need anything fancy to make this recipe. But if you’re getting into making pizza at home on a regular basis, a few basic tools go a long way toward a great result. Here’s what I use:
- Digital kitchen scale for measuring ingredients accurately. I use this literally every day. It dramatically improves all kinds of baking.
- Instant yeast
- Stand mixer for kneading
- Pizza stone for retaining heat in the oven and creating a crisp crust. Pizza steels are a very popular alternative these days.
- Pizza peel for transferring pizza into and out of the oven
- Parchment to make oven transfer easier
Expert tips and FAQs
Cold rise is the key to great flavor in your pizza dough. Under cooler temperatures, yeast fermentation goes more slowly and steadily, which gives it the chance to produce more flavor-enhancing compounds. It’s the laziest magic in the world.
You sure can. You can quadruple it if you like! (But you’ll need a pro-size stand mixer for kneading, or knead in batches.) That said, I don’t really recommend halving it, because…
Yes! This dough freezes beautifully. After the rise, pop it into the freezer in a tightly sealed container for up to six months.
Oh, honey. What can’t you use it for? New York pizza dough makes great calzones, stromboli, and garlic knots, for starters. But you can also make anything from cinnamon rolls to breadsticks to doughnuts. Have a Google. You’ll be amazed.
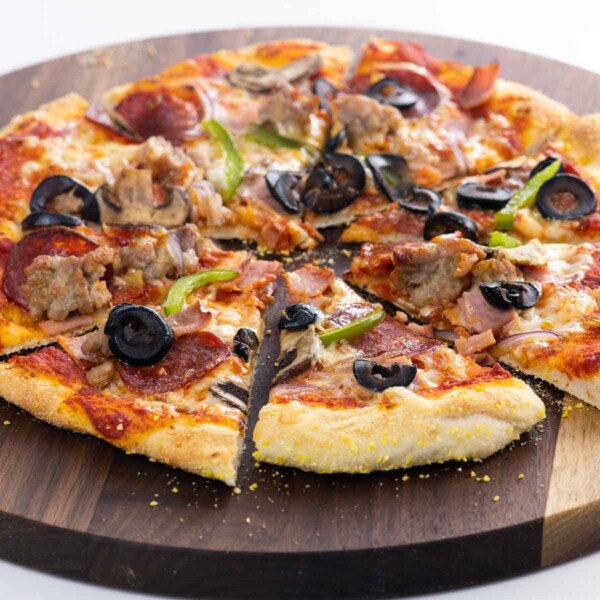
How to make a classic cheese pie
Top the stretched dough with:
- 3/4 cup of thick tomato sauce. I use my favorite homemade tomato sauce mixed with a couple of tablespoons of tomato paste to add thickness.
- 1 ounce of grated pecorino romano or parmigiano reggiano
- 4 ounces shredded mozzarella. I use good old whole milk, low-moisture mozzarella and shred it right before topping.
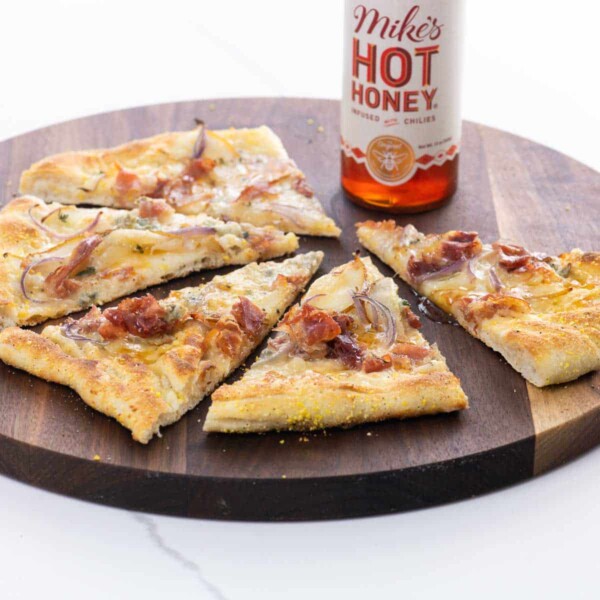
How to make a classic white pie
Brush the stretched dough with olive oil. Then top with:
- 4 ounces of whole-milk ricotta. You can spread it evenly or dollop it
- 1 ounce of grated pecorino romano or parmigiano reggiano
- 4 ounces shredded mozzarella. I use good old whole milk, low-moisture mozzarella and shred it right before topping.
- Freshly ground black pepper
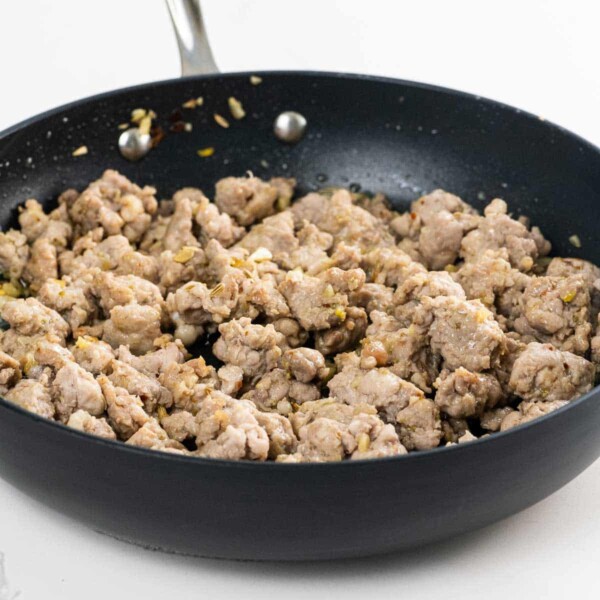
- For the pizza pictured below, I also added a couple of ounces of thickly sliced deli ham, diced up and sprinkled onto the pizza right before the mozzarella // and some snipped chives after the pie came out of the oven
More of our favorite pizza recipes
Here are some of our favorite pies. You can use this New York pizza dough recipe for any of them!
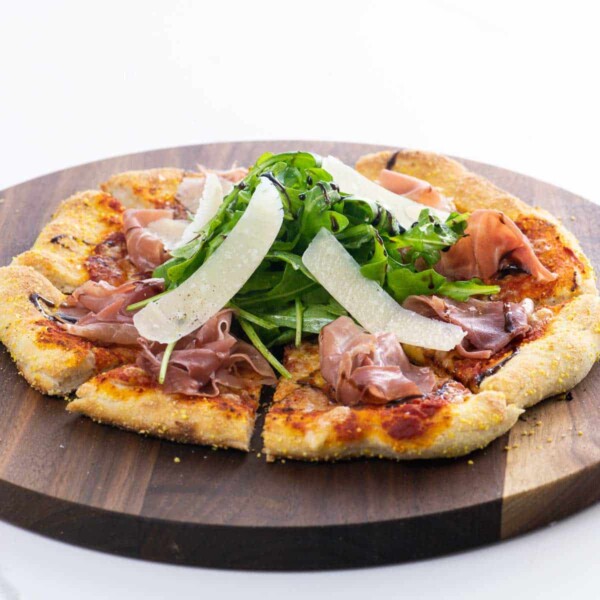
- Prosciutto and arugula pizza with balsamic drizzle
- Cauliflower pizza amatriciana
- Spring vegetable pizza with asparagus and mushrooms
- Watercress pesto pizza

Hungry for more?
Subscribe to Umami Girl’s email updates, and follow along on Instagram.
New York Pizza Dough Recipe
Ingredients
- 400 grams 3 1/3 cups bread flour (see note 1)
- 8 grams 2 1/4 teaspoons/1 packet instant yeast
- 8 grams 1 1/2 teaspoons fine sea salt
- 10 grams 2 1/2 teaspoons sugar
- 250 grams 1 cup plus 1 tablespoon room-temperature water
- 1 tablespoon (15 ml) olive oil
Instructions
- In a large mixing bowl (or right in the bowl of a stand mixer, if you like), stir together the flour, yeast, salt, and sugar.
- Pour in the water and mix well (by hand or with a wooden spoon or silicone spatula) until all the flour is hydrated.
- Pour in olive oil and mix until incorporated.
- Knead dough for 10 minutes. I like to use a stand mixer fitted with the dough hook, but you can do it by hand if you like.
- Divide dough into two equal pieces and form each piece into a ball. Lightly oil and place into two separate sealed containers. Lidded glass food storage bowls or quart-sizes takeout containers works well.
- Let dough rise in the fridge for at least 24 hours, up to 72 hours.
- An hour before you you want to bake the pizzas, remove dough from refrigerator. Set a pizza stone or steel on a rack in the center of the oven and preheat oven to 500°F (260°C) or higher if your oven goes higher.
- When ready to bake, remove dough from container. If you’re a newer pizza maker and would like the extra security of a less sticky dough, feel free to flour it generously.
- Stretch the dough into a rough 14-inch round. You do not need to do a perfect job to end up with good pizza.
- Top the pizza judiciously. For cheese pizza, I use a not-obscene amount of thick tomato sauce, grated pecorino cheese, and low-moisture whole-milk mozzarella that I shred right before topping.
- Slide the pizza into the oven and bake for 10 minutes, until cheese is melted and bubbly and crust is cooked and browned in spots.
Step-by-step video
Notes
- It's best to use a digital kitchen scale to weigh out your ingredients for this recipe. If you don't have one, you can use the volumetric measurements. Make sure to use the spoon and level method to weigh the flour, as called for across this site. In my recipes, 1 cup of flour weighs 120 grams, which is on the lighter side of the range.
- Instant yeast is not the same as active dry yeast. They look almost the same, but instant yeast does not need to be dissolved in water before using.
- When using a stand mixer with the dough hook, never go above Speed 2.
- For the sauce, I use my favorite homemade pomodoro mixed with a little bit of tomato paste for added thickness.
- Even though I've been making homemade pizza for years, I still like to place a piece of parchment onto a pizza peel and slide the whole thing from peel to stone. It really reduces the stress of getting the pizza into the oven. You can place the stretched dough directly onto a pizza peel sprinkled with a little cornmeal instead if you're brave.
Nutrition
Nutrition information is automatically calculated, so should only be used as an approximation.
Hungry for more?
Subscribe to Umami Girl’s email updates, and follow along on Instagram.


Oops! I just made your recipe and it’s in my fridge now, but then I read that it says instant yeast (on your recipe), not active dry yeast (which is what I used). Is the dough ruined?
Hi Robin, don’t worry, it should be just fine. There are some differences between the two types, but for this recipe you don’t need to worry about them. Hope you love it!
Hi Carolyn, the recipe worked perfectly. I made overnight.
Thank you for sharing.
So glad, Ricardo.
I keep coming back to this recipe ….. NEVER fails and so simple ! If I can, I like to let it go in the fridge for the full 72 hrs but still delicious after 24….. thanks for a real winner.
That’s great, Shirley. I’m so glad. xx
I teach culinary skills at a homeschool co op and I only have an hour for each class. Can I freeze this dough after it’s been made and gone through its rise time so we can make pizzas with it the next class?
Hi, Melissa! Yes, you absolutely can freeze it after it’s completed its rise. Just defrost it in the fridge for 24 hours or so before using.
Excellent recipe. Thank you for sharing.
Thank you, Micah. So glad!
Thanks for this recipe! It was so good I was shocked I made it. I used the best ingredients I could find. King Aurther Bread Flour, High quality Olive oil (yes worth it). I decided to give it a shot after I was in NYC on a work trip and brought a few bottles of NYC tap water home. I don’t know if that made any difference since I haven’t tried ‘regular’ tap water, but the crust was so flavorful.
My first half kinda failed. I was going to go the corn meal on peel route and it contracted to much and I managed to get a bunch of corn meal mixed in the dough… so I made bread sticks and brushed with garlic butter. They were great.
Second run I still had a hard time with the dough contracting so I got more like a 10″ pizza. It was thicker than I wanted but still very tasty.
Hi, Jason! Thanks for sharing, and I’m so glad you liked it. Keep practicing and you’ll totally get better at shaping the dough. It’s not easy — I always feel like my skills are a work in progress.
Great recipe. Made it several times. My shaping skills are a work in progress! Thanks for sharing a simple recipe.