This post may contain affiliate links. Learn more.
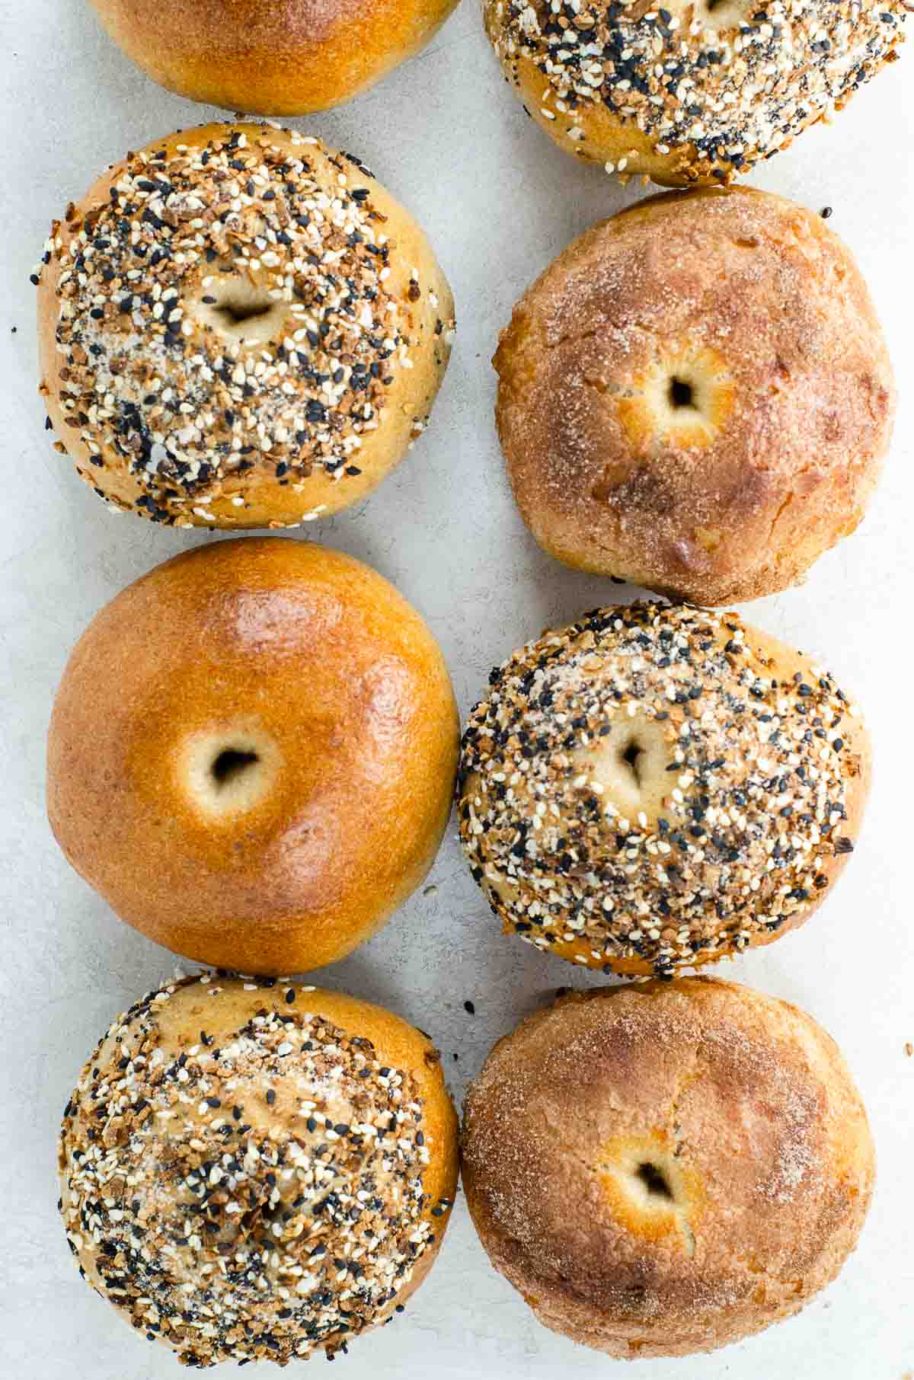
Making sourdough bagels at home is one of those cooking projects that can make you feel positively omnipotent. These bagels are chewy and flavorful and downright perfect. And though the process may feel a little intimidating at first, it’s totally doable. I promise.
Why we love this recipe
Oh, you guys. I’ve been making this sourdough bagel recipe every week for MONTHS now. I’ve been so excited to share it with you, but since sourdough has kind of a lot going on, I wanted to wait until I knew it like a BFF and was sure I could answer all your questions.
We’ve now been together long enough that we’ve seen each other in all sorts of moods and states of the world, and we’ve grown and changed together. It’s time. I’m so glad.
These sourdough bagels are:
- Perfectly chewy, like the best of the best of New York-style bagels
- But with that inimitable sourdough flavor, too. People, what did we do to deserve all this goodness?
- NOT shockingly huge, which I love
- Really good plain, but also amenable to all your favorite savory and sweet bagel toppings
When I shared this recipe with a friend, she said they were the best bagels of her life. I don’t disagree. Bonus: Connecting with friends seems to be an innate, happy fact of this recipe. It came to me through a friend, too.
Ingredients
Here’s what you need for this bagel recipe.
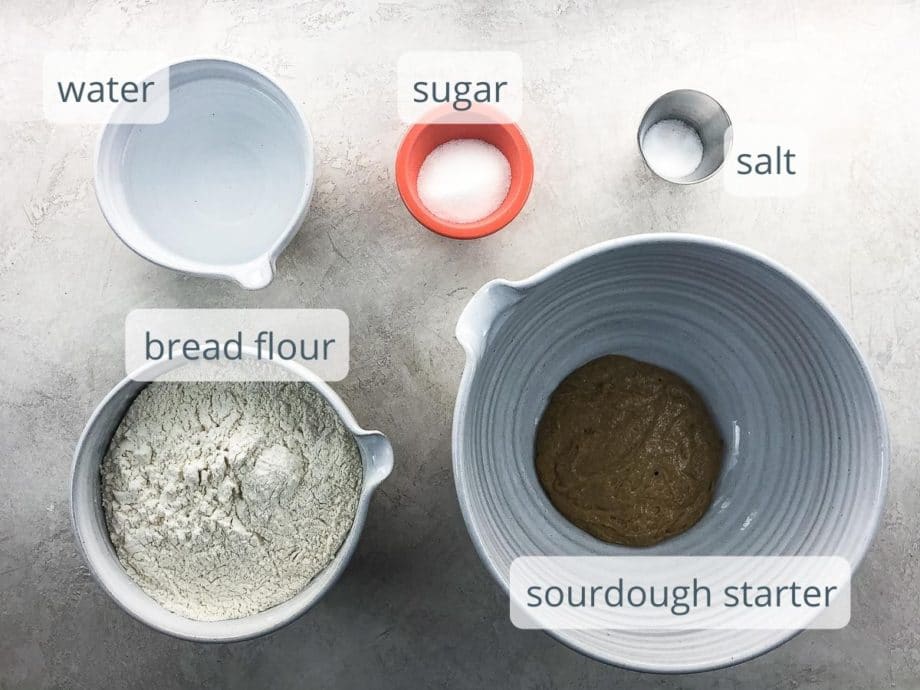
- Sourdough starter: If you’re here for a sourdough bagel recipe, I’m guessing you already have a starter. If not, I’ll be posting more about how to create one soon. You want to use active starter for this recipe, so feed your starter about 12 hours before you’d like to start making the bagel dough. My starter is 100% rye flour, which makes both a super-vibrant starter and terrific bagels.
- Bread flour: Bread flour contains more protein than all-purpose flour, which gives it the strength to produce beautifully risen breads and chewy bagels. I have made this recipe many times with both King Arthur bread flour and an artisan high-protein wheat flour from Barton Springs Mill. The recipe works well as-is with both types of flour.
- Sugar doesn’t make the sourdough bagels taste sweet. It feeds the yeast and helps the dough rise.
- Salt: I use fine sea salt in this recipe. Salt has several roles in dough-making, one of which is to draw water away from the flour. In order for this to work properly, you want to use a salt without additives, which could get in the way. Fine sea salt is always a good choice.
How to make it
Not gonna lie, making sourdough bagels is a bit of a PROCESS. It’s a fun and rewarding process, to be sure.
Here’s where we break it down for you! You can see all the steps in action in the video that accompanies this post, which is especially useful for visual cues when shaping the dough.
Make the dough
About 12 hours before you want to start making sourdough bagels, feed your sourdough starter. It should be nice and active and bubbly when you begin.
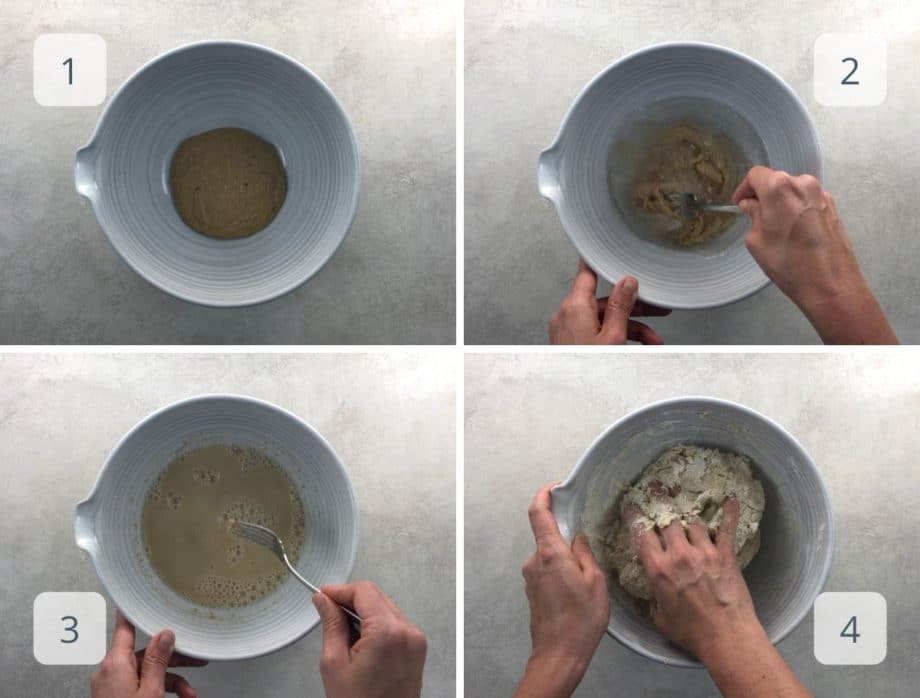
- Here’s our nice, bubbly, active starter.
- Mix in the water and sugar.
- Here’s the mixed, bubbly starter // water // sugar combo.
- Mix in the flour and salt. I like to use a fork at first and then my hand as the dough gets stiffer and less sticky.
Knead and rest the dough
Since this is a stiff dough, I like to knead it in the stand mixer with the dough hook.
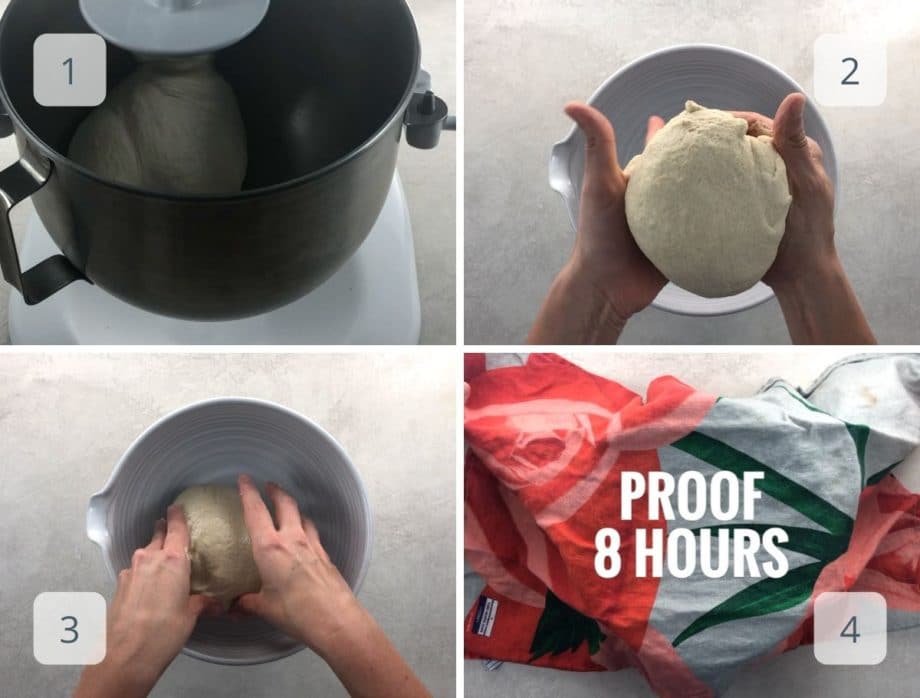
- Knead the dough for eight minutes. Always use speed 2 when kneading in a stand mixer.
- Shape the dough into a ball.
- Place it into a clean, lightly oiled bowl and turn it around a few times to coat.
- Cover the bowl and let it rest for eight hours. You can do this during the day and pop the dough into the fridge overnight, or make the dough at night and let it rise on the counter while you sleep.
Shape the bagels
Here’s how you’ll shape the bagels. This part is fun and kinda makes me feel like a superhero.
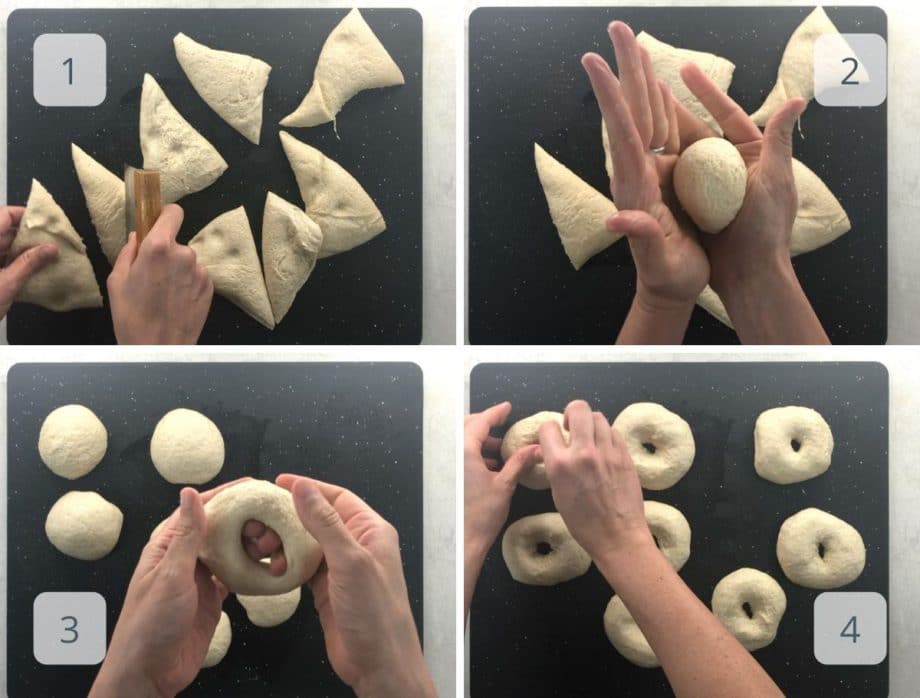
- First, cut the dough into eight roughly equal pieces. The shape doesn’t matter much, but I usually cut into wedges because it seems easier to estimate size.
- Tuck all the ends underneath repeatedly until you can’t see any seams, and use your hands to form each piece into a smooth ball. You can see this happen in the video. Then let the dough rest and relax for 10 minutes.
- To shape the bagels, poke a hole in the center, then pick up the dough and work it into a bagel shape. Again, see the video for more visual cues. The holes will close up a bit, and that’s fine.
- Let the sourdough bagels rest for 20 minutes. They’ll puff up a little bit at this stage, but not a ton.
Boil, top (if ya wanna) and bake the bagels
This part is easy and rewarding. Here’s what you’ll do.
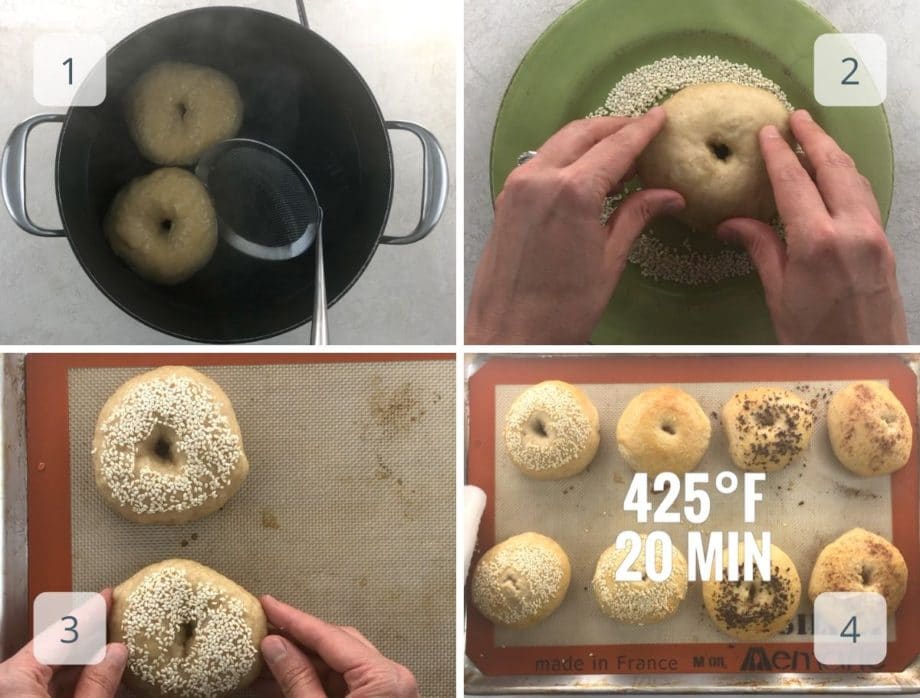
- Stir a tablespoon of honey into the water in a medium pot and bring it to a boil. The sugar in the honey encourages browning in the oven and creates the subtlest hint of sweetness that complements the overall flavor profile. It won’t make the bagels taste sweet. See the FAQs below to learn about why we boil bagels.
- Gently press (and roll a bit if you like) the top of the bagel into the toppings.
- Place on a silpat- or parchment-lined baking sheet.
- Bake for 20 to 25 minutes, until the sourdough bagels feel light and are browned to your liking.
Expert tips and FAQs
Boiling creates a bagel’s signature crust and chewy interior. The water causes the starches on the outside of the bagel to gel almost immediately, preventing the water from penetrating very far into the bagel.
The longer you boil the bagel, the thicker the crust will be. The crust keeps the dough’s rise in check in the oven, which is what creates a chewy texture (in combination with bread flour). So for chewier bagels, boil for a little longer. For softer, puffier bagels (which, NO, says this New York area woman, but you do you), boil a little less.
Adding a little bit of honey encourages browning in the oven and imparts the tiniest hint of sweetness. You won’t taste it per se, but it rounds out the flavor in a really good way.
Here’s what I like to do. The day before I want to serve bagels in the morning, I feed my sourdough starter when I wake up.
Then, before I go to bed, I make the bagel dough.
Let it rise overnight on the counter.
Then shape, boil, and bake the sourodugh bagels in the morning. (This sounds like a big deal but kinda isn’t once you’ve done it once or twice.)
You can also scooch the whole process back twelve hours, let the dough rise during the day, and pop it into the fridge overnight. I’ve found you don’t need to let the dough come back to room temperature before shaping it into balls. It happens naturally during the shaping process.
Our favorite bagel toppings
When making a batch of eight sourdough bagels, I tend to make two plain bagels (which are super-flavorful, since sourdough has so much going on) and two each from among the following:
- Everything: You can buy this seasoning blend or make your own. Here’s how to make your own everything bagel seasoning: Four parts poppy seeds // two parts white sesame seeds // two parts black sesame seeds // one part dried garlic // one part dried onion or shallot // one part flaky sea salt like Maldon
- Sesame seed
- Cinnamon sugar: For two bagels, mix 1 tablespoon sugar with 1/4 to 1/2 teaspoon cinnamon.
- Onion: Use dried minced onion or shallot. These cook quickly, so just like at the bagel shop, they may get quite brown.
- Poppy seed
- Salt: Use flaky sea salt or coarse Kosher salt
What to put on a bagel
Ugh, you guys. Deciding what to put on your bagel is kinda one of life’s great joys, isn’t it? Here are some favorite ideas:
- Salted, cultured butter and maybe an additional sprinkle of flaky salt if the mood strikes
- Add some jam
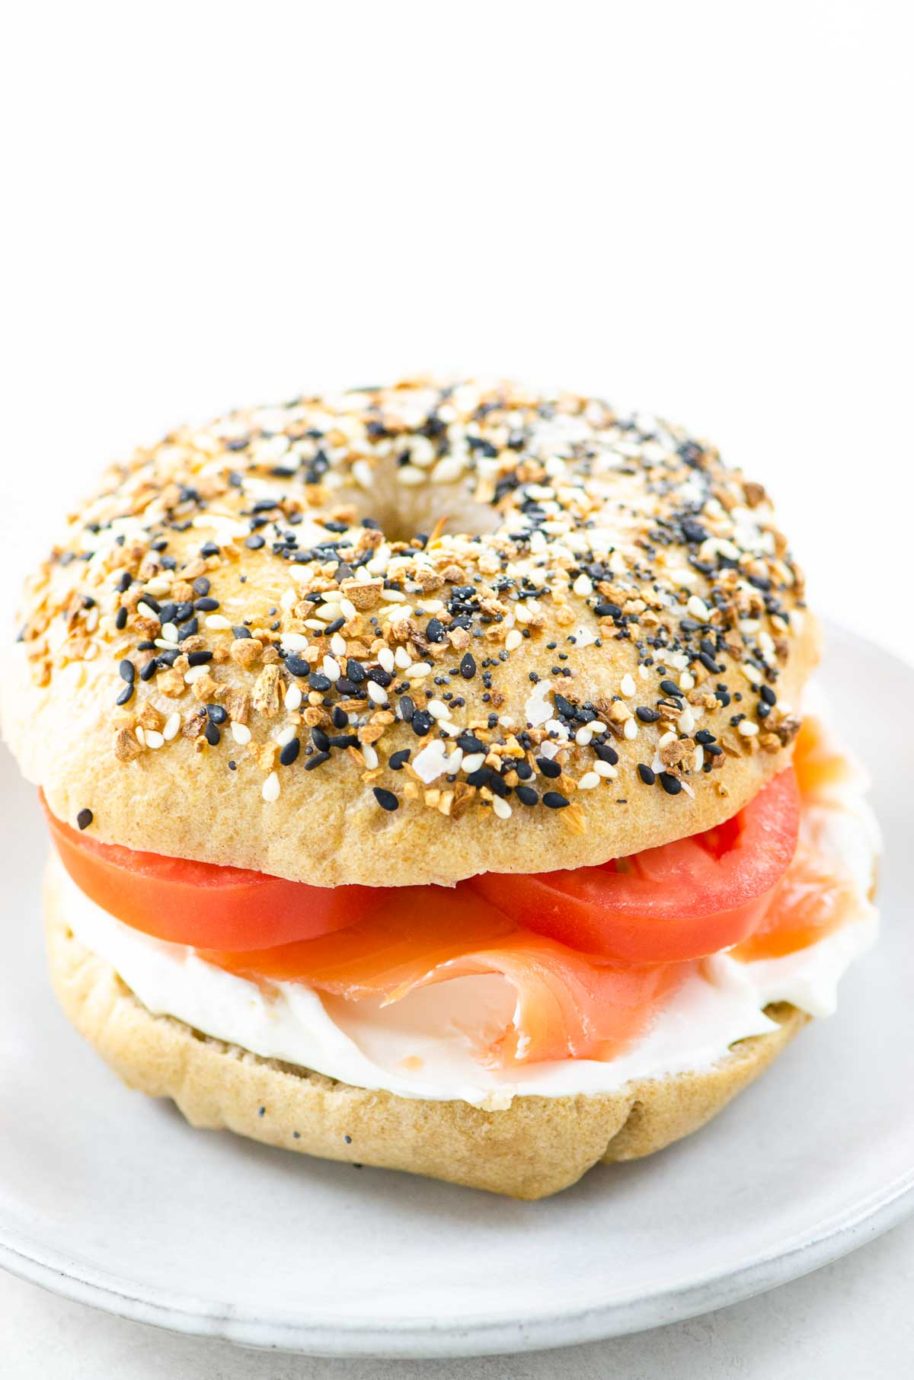
- Cream cheese, with or without lox, sliced tomato, capers, and red onion
- Our super-savory lox spread
- A good old NJ-style egg sandwich: a fried egg with a broken yolk // bacon, ham, sausage, or pork roll if you like // a slice of cheese
- PB&J
- Tomato sauce and shredded mozzarella for a pizza bagel
- Hummus
More sourdough resources
- How to create and maintain a rye sourdough starter
- Rye sourdough bread
- My favorite crackers to make with starter discard
- Classic banana bread made with starter discard
- Scallion pancake made with starter discard
Artisan Sourdough Made Simple
This sourdough bagel recipe is adapted from the charming, approachable gem of a book Artisan Sourdough Made Simple by Emilie Raffa. This book is FULL of fun, beautiful, diverse sourdough recipes, and I HIGHLY recommend you buy it.
Sometimes a cookbook is eye candy, sometimes it’s a cozy story, and sometimes it’s one you’ll cook from many times. Emilie’s book is all three.
Emilie also writes the blog The Clever Carrot.
Summarize & Save This Content On

Sourdough Bagels
Ingredients
FOR THE BAGELS
- 150 grams active starter
- 250 grams room-temperature water
- 25 grams sugar
- 500 grams bread flour
- 10 grams fine sea salt
- 1 teaspoon safflower oil, for the bowl
- 1 tablespoon honey, for the water
TO TOP THE BAGELS, IF YOU LIKE, A FEW TABLESPOONS OF
- Everything seasoning
- Sesame seeds
- Cinnamon sugar
- Dried minced onion or shallot
- Poppy seeds
- Flaky sea salt or coarse Kosher salt
Instructions
Make the dough and let it rise
- In a large mixing bowl (or right in the bowl of your stand mixer, if you like), stir together the sourdough starter, water, and sugar with a fork to break up the starter. It doesn’t have to be perfectly incorporated into the water.
- Add the flour and the salt. Mix until there’s no loose flour. I find it’s easiest to start mixing with the fork and then switch to using my hand as the dough stiffens and gets less sticky.
- Knead the dough for eight minutes. You can do this by hand, but it’s much easier in a stand mixer since this dough is quite stiff. In a stand mixer, use the dough hook on Speed 2.
- Clean the bowl and oil it. Use your hands to work the dough into a nice ball and place it in the bowl. Turn it over a few times to coat with oil. Cover with a damp kitchen towel, a plate that’s big enough to sit on the rim of the bowl, or plastic wrap.
- Let the dough rise for eight hours. At this point, you can make the bagels or stash the dough in the fridge overnight.
Shape the bagels
- Line a half sheet pan with a silpat or a piece of parchment. Preheat the oven to 425°F / 220°C with a rack in the center.
- Turn the dough out onto a work surface. You generally shouldn’t need flour, but every once in a while depending on conditions, I find the dough is a little stickier and it helps to toss down a bit of flour.
- Divide the dough into eight roughly equal pieces. I usually work with wedges, but it doesn’t really matter what shape you cut the pieces. Use your hands to tuck the ends of each piece underneath until you’ve formed a nice, smooth ball with no visible seams.
- Place the balls on the lined baking sheet, cover with a towel, and let rest for 10 minutes.
- Now is when we shape the bagels! Use an index finger to poke a hole in the center of each ball, then lift it up and use your hands to widen the hole to about an inch diameter, making the dough into a ring shape. When you place the bagel back onto the baking sheet, the hole will close up a bit. That’s fine.
- Cover the bagels again with a towel and let rest for 20 minutes. You can prep the boiling water while you wait.
Cook the bagels
- Fill a medium pot halfway with water and stir in the honey. Bring to a boil.
- Two at a time, carefully drop the bagels into the boiling water. After a few seconds, they’ll float. (If they stick slightly to the bottom of the pot, you can give them a gentle nudge with a utensil to unstick them and they should float right away.)
- Once they float, boil for 45 seconds or so on one side. Then flip and boil for 45 seconds on the other side. Remove from the water with a strainer or slotted spoon, dab on a few paper towels to remove excess water, and place back on the lined baking sheet.
- When bagels are just cool enough to handle, add any toppings by pouring the topping evenly onto a medium-sized plate and pressing the top of the bagel gently into the topping until it’s coated to your liking.
- Repeat until all bagels are boiled and topped.
- Slide the sheet pan into the oven and bake for 20 to 25 minutes until bagels are lightly browned. When they’re done, they’ll feel fairly light and the crust will be firm, golden, and positively bagel-like.
- Let cool on a rack and serve warm or at room temperature.
Notes
- This sourdough bagel recipe is adapted from the charming, approachable gem of a book Artisan Sourdough Made Simple by Emilie Raffa. This book is FULL of fun, beautiful, diverse sourdough recipes, and I HIGHLY recommend you buy it. Sometimes a cookbook is eye candy, sometimes it’s a cozy story, and sometimes it’s one you’ll cook from many times. Emilie’s book is all three.
- You’ll need a kitchen scale for this recipe. If you’ve got a sourdough starter, you probably already have one. If not, this is a great small investment that will instantly improve your baking. Here’s the kitchen scale I’ve been using for years.
- A note on timing: You can make the dough in the late evening and let it rise overnight, then make the bagels in the morning. Or you can make the dough early in the day before, let it rise for eight hours, and then refrigerate it overnight. I’ve found it’s fine to proceed to the shaping stages right after pulling the dough from the fridge in the morning.
- Bagels are best eaten the day they’re baked, but any leftovers will still be good toasted the next day, even if you’ve left them out uncovered on the counter.
Nutrition
Nutrition information is automatically calculated, so should only be used as an approximation.




Hi there! Thanks for sharing your love of great recipes; I’m eager to try this one, being a few years into my sourdough journey, with a very healthy rye starter at hand.
Question for you (or for any reader who has experimented): Would you have any ideas about how to adjust the ratios for whole spelt or whole wheat flour instead of standard bread flour? Thanks!
Hi, Daniel! Truth be told I haven’t experimented with whole grain flours in these bagels yet, but it’s a nice idea. Better-quality flours are so individual in their needs and characteristics. I’d start with a relatively small percentage of whole grain, say 25%, and increase the hydration (and perhaps the kneading time) just a bit at first, maybe just an additional percentage or two. Even with adjustments, the more whole grain you use, the less chewy the bagels will be, so it will come down to a question of your own preferences. Not sure whether you’ve made this recipe yet as-is, but the dough is much stiffer than a standard sourdough loaf, so keep that in mind as you’re getting a feel for the hydration levels. Let us know how it goes if you decide to play around!
Hi, Carolyn.
I posted last summer about how much I adore your recipe for Sourdough Rye bread (the best ever). Now I have been trying other great recipes on your site and would like to try the bagels but . . . I don’t have a stand mixer. Can you give an estimate of time for kneading by hand? And any particular recommended kneading technique?
Thanks again!
Hi, Emma! Thanks for the kind comment — so glad you’ve been enjoying the recipes. It should take about 8-10 minutes of hand-kneading. This dough is *much* stiffer than the bread dough, so you can use a regular, lightly-floured flat work surface and any basic kneading technique you’re comfortable with.
Thanks — I’ll let you know how it goes!