This post may contain affiliate links. Learn more.
Savory, jammy caramelized onions are a fabulous kitchen hack. They add depth of flavor — in a perfect balance of savory and sweet — to a wide variety of recipes, from risotto to epic braised veggies to burgers. They take a hot minute to make, but they last for a while and freeze well, so it’s totally worth the effort. Here’s how to do it.
Why we love this recipe
There’s a handful of kitchen techniques which, while not hard to master, make me feel almost omnipotent. Using a high-speed blender to make almond milk, cashew cream, or vegan queso, for example. Producing a savory, crave-worthy Thanksgiving gravy without a turkey in sight. Reverse searing a perfect steak or pork chop. And making a perfect batch of savory, jammy caramelized onions.
This versatile condiment adds SO much flavor to just about anything you want it to. In addition to the recipes I’ve shared below that formally incorporate caramelized onions, try using them as a pizza topping, stirring them into labneh or Greek yogurt to make a dip, or topping some lentils with them.
I first published this recipe here in early 2020 — inexplicably late for such a recipe staple. I’ve since updated the post slightly for clarity, but the recipe hasn’t changed.
What you’ll need
You don’t need very many ingredients to make this sweet and savory condiment. The magic is in the cooking process. Here’s a glance at what you’ll need:
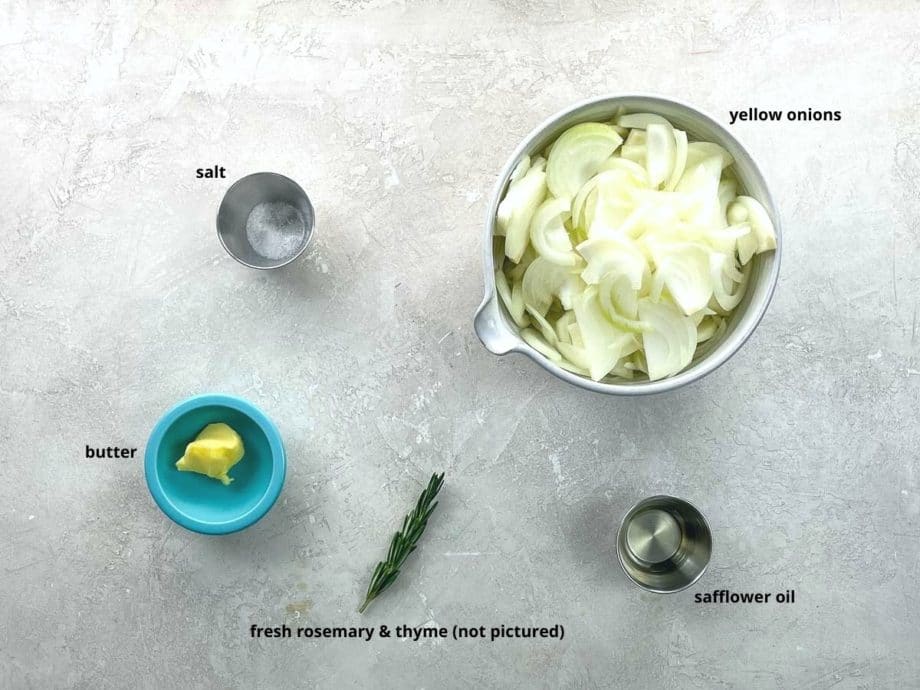
- Start with about two pounds of yellow onions. This will look like a lot at first, but they shrink down remarkably as they cook. Even though this standard onion variety isn’t one you’d think of as sweet, you’ll be amazed by how much sweetness they develop as they cook.
- Safflower oil is my high-smoke-point, neutral-tasting vegetable oil of choice. You can substitute another oil that has similar properties, such as canola, sunflower, peanut, corn, or vegetable oil blend. If you prefer, you can use olive oil or another oil that suits your diet.
- Use a really good-quality butter if you can. Here and virtually everywhere, I start with a cultured, salted butter from grass-fed cows. This sounds fancy but doesn’t have to be. Kerrygold, for example, is sold in most supermarkets at a reasonable price.
- A sprig of fresh thyme and a sprig of fresh rosemary add so much subtle depth of flavor. You don’t need to remove them from their stems before cooking — just pull out the stems at the end.
How to slice onions for caramelizing
Caramelizing onions takes a bit of patience and attention, but it isn’t hard at all.
The first detail is in the slicing. After trimming the ends off your yellow onions and removing the skin, you will halve them from end to end (tip to root), rather than across the middle. (This is how we start our onion chopping for almost every purpose, and it matters a lot here.)
Then you’ll slice the onions thinly, also from tip to root. Slicing onions this way rather than crosswise helps them to keep some of their structure even while cooking down into an almost jammy consistency. It prevents them from turning to mush, basically, which is a very good thing.
How to make them
Here’s an overview of what you’ll do to make a perfect batch of jammy caramelized onions. Your motto is slow and steady wins the race. You can see the steps in action in the video that accompanies this post, and get all the details in the recipe card below.
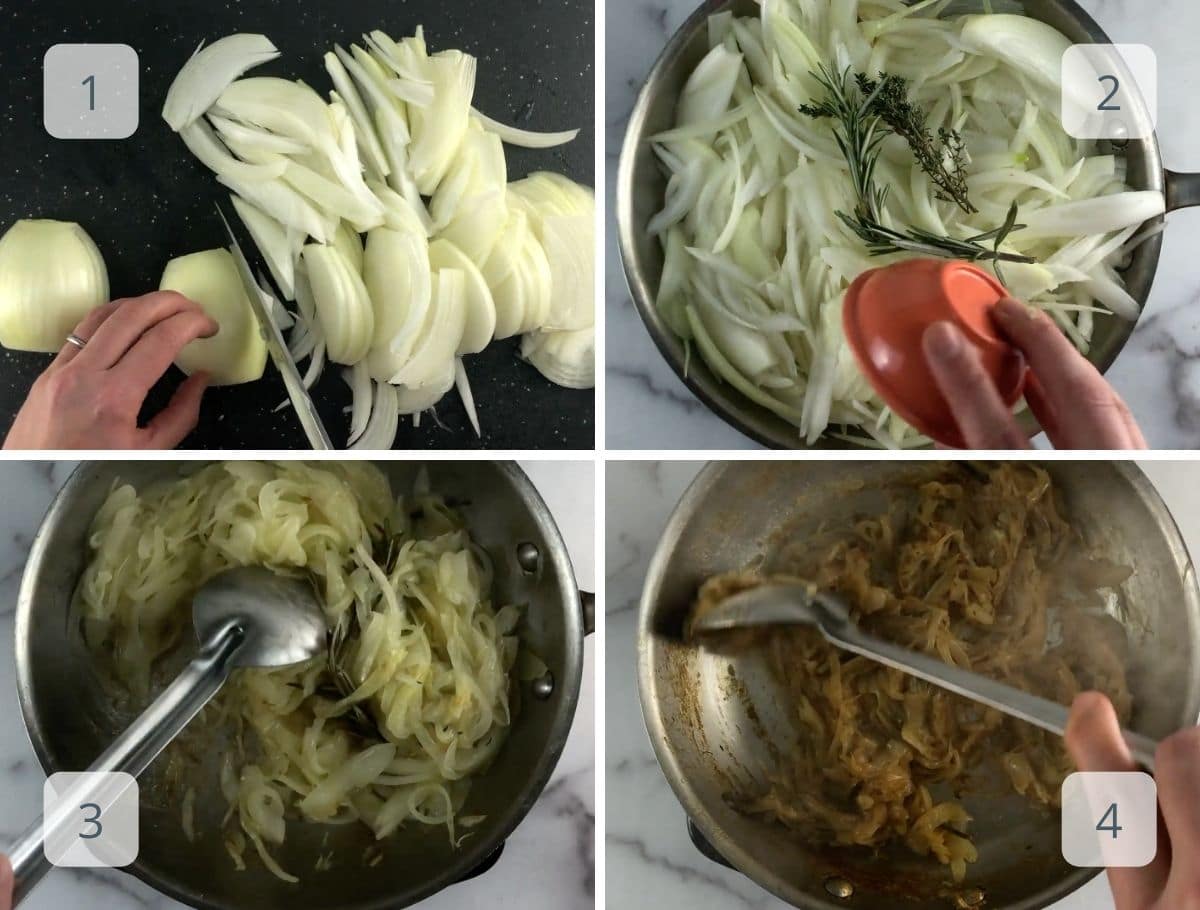
- Peel and trim the onions, then halve them and slice them from root to tip.
- In a 10-inch frying pan with a nice, heavy bottom (to hold and distribute the heat evenly), warm the oil together with the butter over medium. Add the onions — the pan will be quite full at first — and stir them to coat with the fat. Add the thyme, rosemary, and salt, and stir again.
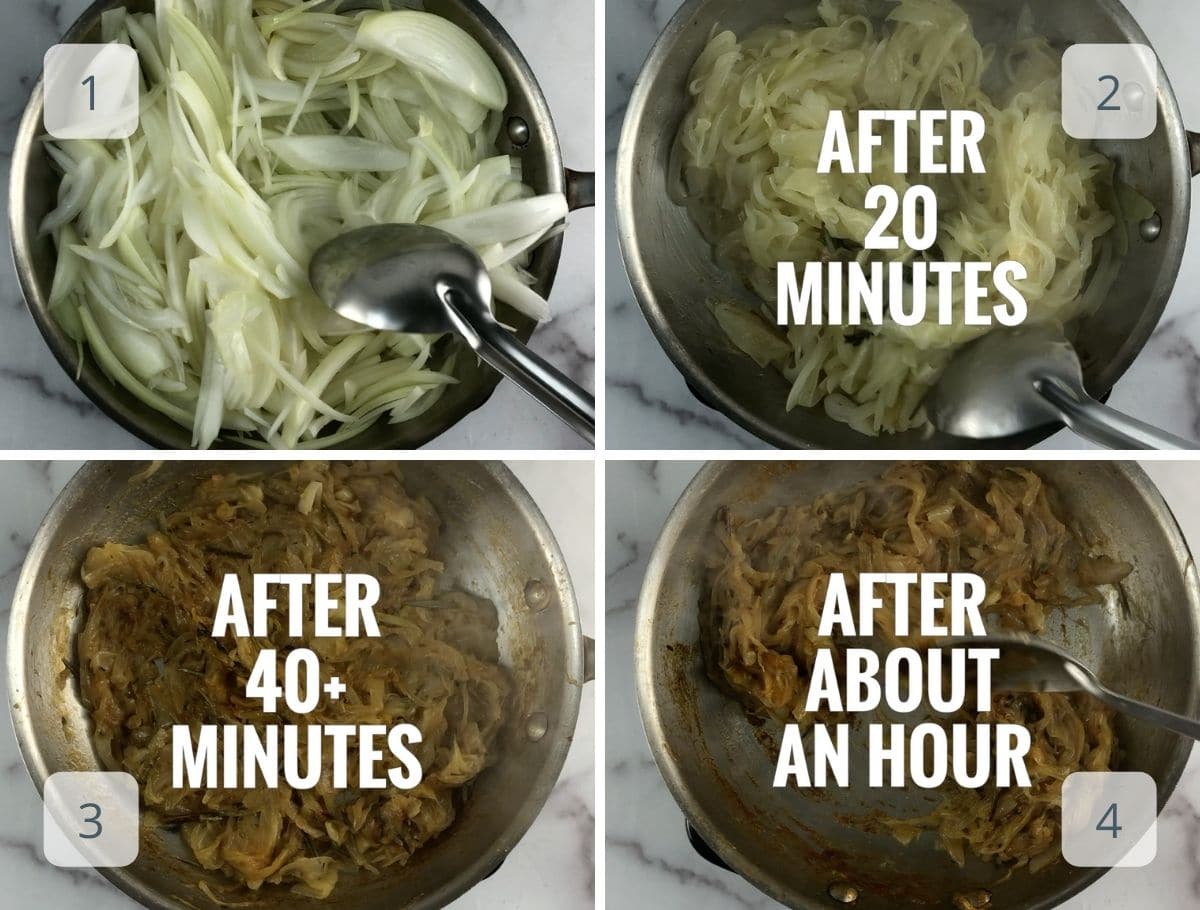
- For the first 20 minutes or so, the onions will release a lot of moisture and reduce in volume substantially. During this time, you’ll stir occasionally to keep the onions cooking evenly. You’ll adjust the heat if necessary to prevent burning. The onions will begin to soften but won’t develop too much color during the first 20 minutes.
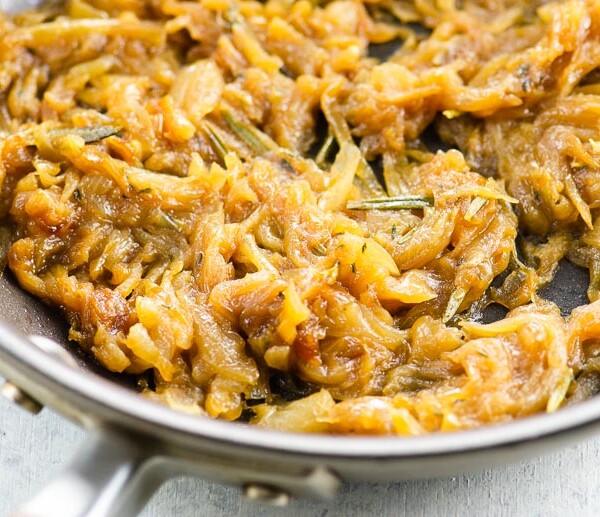
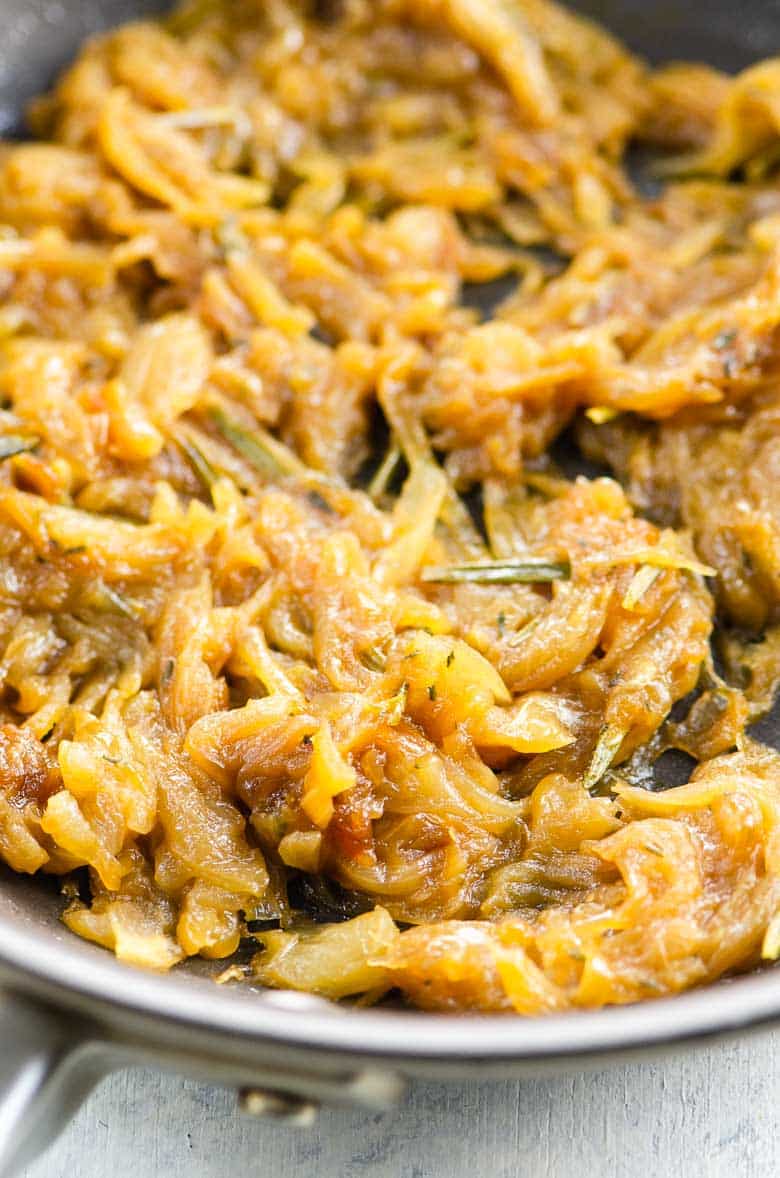
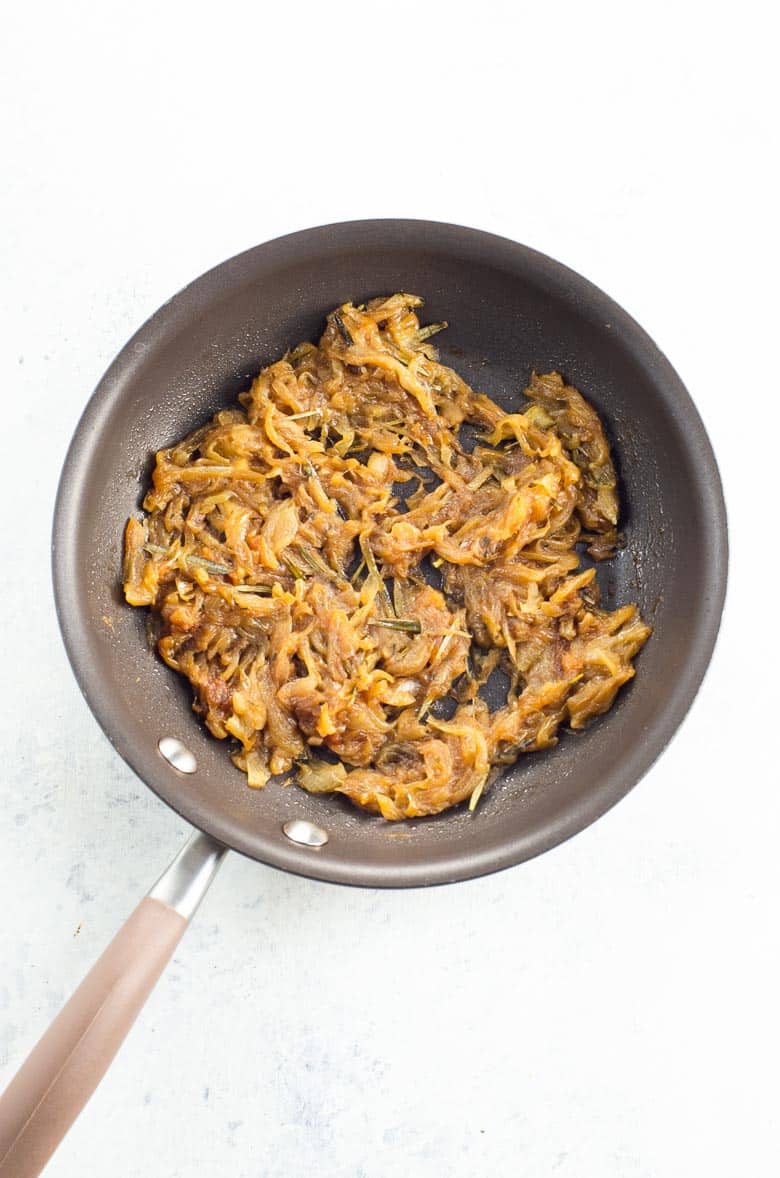
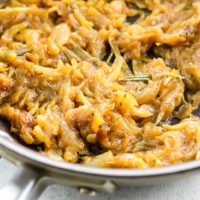
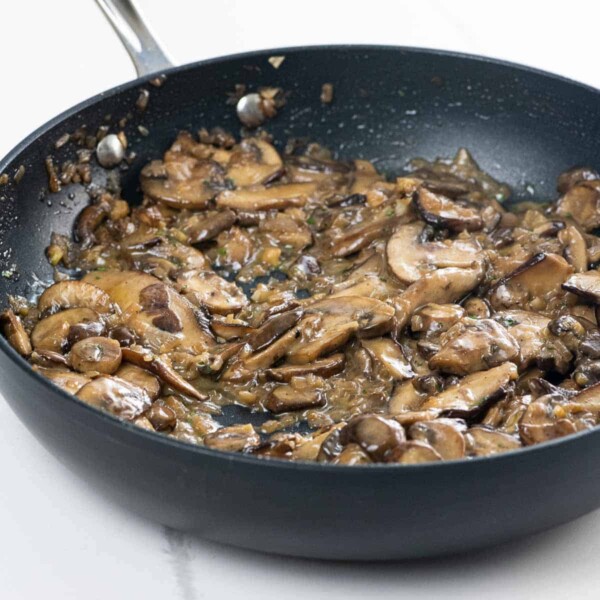
- During the next 20 to 40 minutes, the onions will really start to take on a beautiful brown color, sweetness, and jamminess. Your job during this time is to stir the onions just the right amount. You want them to get a little bit browned on the bottom, but without burning, before you stir each time. Then you’ll scrape up those gorgeous, flavorful browned bits while stirring the onions with a metal spoon or spatula. The onions are done when you think they’re done. We like them to look the way they do in the photos: dark golden brown, and not the slightest bit burned.
Stages of caramelization
Here’s how the onions look right after going into the pan, after 20 minutes, after 40 minutes, and after about an hour. Your mileage will vary based on your pan and burner, but it can be helpful to see a few general reference points.
Expert tips and FAQs
Over time you’ll learn exactly how dark you like your caramelized onions. My favorite point to stop is when they’re a gorgeous mahogany brown and just on the cusp of jammy. At this stage they’re super sweet and savory and not at all burned.
Once completely cooled, place them into an airtight container.
They’ll keep well in the fridge for at least a week, and in the freezer for a year.
If you end up with extras, give future you a little present by popping them into the freezer in an airtight container. You’ll be so glad to stumble upon them in a few months and tuck them into a risotto or dip.
How to use jammy caramelized onions
Here are a few of our favorite recipes that call for caramelized onions, plus a few where you should feel free just go ahead and add them.
- Bacon, spinach, and onion risotto
- Braised kale with blue cheese and walnuts
- Bacon weave burgers
- French onion soup potato skins
- Shake Shack burgers
- White bean dip
Summarize & Save This Content On
Jammy Caramelized Onions Recipe
Equipment
Ingredients
- 2 pounds (910 grams) yellow onions
- 1 tablespoon (15 ml) safflower oil (or other high heat vegetable oil)
- 1 tablespoon (14 grams) butter
- 1 sprig fresh rosemary
- 1 generous sprig fresh thyme
- ¼ teaspoon fine sea salt, more to taste
Instructions
- Peel and trim ends from onions. Halve onions from root to tip, then slice thinly from root to tip. See step-by-step photos and video for visual cues. Cutting from root to tip (as opposed to crosswise) is the way to ensure the onion slices will hold enough of their shape while caramelizing, rather than dissolving into mush.
- Heat oil and melt butter together over medium heat in a 10-inch frying pan with a heavy bottom.
- Add onions and stir well to coat with oil and butter. Add rosemary, thyme, and salt, and stir again.
- For the first 20 minutes or so, the onions will sweat a lot and reduce in volume substantially. Stir occasionally during this time to keep them cooking evenly, and adjust the heat as necessary to prevent burning. Don’t expect to see too much color on the onions during this time.
- During the next 20 to 40 minutes, the onions will really start to caramelize. Your job during this time is to stir the onions not too little but not too much. Allow them to get a little bit browned on the bottom without burning, and then scrape up the browned bits while stirring the onions with a metal spoon or spatula. Typically the heat should be in the medium to medium-low range, but your mileage may vary.
- Over time you’ll learn exactly how dark you like your caramelized onions. Our favorite point to stop is when they’re a gorgeous mahogany brown and just on the cusp of jammy. At this stage they’re super sweet and savory and not at all burned.
- Remove any large herb stems before using these babies in whatever recipes you like (or just spooning over all your hopes and dreams).
Notes
- Use a nice, heavy-bottomed frying pan to caramelize onions. I like my All-Clad 10-inch stainless steel frying pan for this purpose. We normally wouldn’t use nonstick to caramelize onions because the bit of sticking the onions do helps to deepen their flavor. But if you have really great nonstick cookware that can handle metal utensils, like the Anolon products linked here, that’ll work, too. (And boy do we love those pans.)
- Caramelized onions keep well in an airtight container in the fridge for at least a week, and in the freezer for a year.
Nutrition
Nutrition information is automatically calculated, so should only be used as an approximation.


I make this also but usually add either a tablespoon of soft brown sugar or a splash of Balsamic or Cherry or even Black chinese vinegar for a darker colour. I love this with pretty much everything.